“Face pulls? Really, Tony? That’s what you’re going to write about today? What’s next: Talking about the Kreb’s Cycle? Discussing all the uses of Osmium? Breaking down who will win this season of The Bachelorette?”1
I get it. Face pulls aren’t the most exciting exercise in the universe, but I’ve never been someone who feels exercise has to be entertaining.
I want to help get people results and I want people to stay healthy.
Face Pulls have been an exercise I’ve utilized in my programming – both personally and with clients – for as long as I can remember. I try not to play favorites but I can’t think of an instance where I haven’t sprinkled them into a program in some way, form, or fashion.
They’re one of the most user-friendly and effective exercises to strengthen the upper back, posterior cuff, and help keep the shoulders healthy.
Now that’s sexy.
In fact, if I were to rank their sexiness in the pantheon of sexy things it would look like this:
1. Sade singing pretty much anything.
2. Tom Selleck’s mustache.
3. Face Pulls.
4 – 13,908,743. Anything my wife wears, says, or does.
Hyperbole aside – is it too late to add my pecs onto that list? – there are few things to consider when it comes to common mistakes people make with the exercise and execution in general.
1. Face Pull Fix – General Set Up
It’s not inherently wrong to do so, but I’m not a huge fan of people utilizing a pronated (overhand) grip with this exercise.
It locks people into a more internally rotated position in the glenohumeral joint as well as narrows the acromion space, which can predispose people who are vulnerable to impingement syndrome.
Instead I like this approach:
2. Face Pull Fix – Too Much Low Back Movement
Another common mistake some make with the execution of this exercise is using a squared stance.
Again, it’s not inherently wrong, but a squared stance provides an opportunity for some people to crank through their lumbar spine and promote more of a rib flare.
The fix is to
Adopt a staggered stance
Revert to a tall or half-kneeling position.
Both options help omit extraneous movement from the lower back.
NOTE: Excessive forward head posture is common too and can be fixed by telling people to 1) stop doing that, 2) telling them to make a “double chin,” or 3) place a tennis ball underneath the chin.
3. Face Pull Fix – Adjusting to the Lifter
There’s never a one-size fits all approach to any exercise. As coaches and trainers it’s important to do our due diligence and adjust/temper any given exercise to fit the needs, goals, and ability level of our clients.
With the Face Pull I’ll usually set it up so the vector of pulling is in more of a top-to-down fashion.
Meaning: most often the goal is to nudge people into more scapular retraction and depression.
However, in some cases it can be challenging for some lifters – due to a litany of scenarios: pattern overload (too much bench pressing), sitting in front of a computer for half their life – to get into proper position to perform the exercise well.
Some may present with more anteriorly tilted scapulae and/or over-active upper traps and the exercise has to be adjusted.
4. Face Pull Fix – Scapular Motion
We want bone-on-bone congruency between the shoulder blades and rib cage throughout.
In other words: I want to see the scapulae move around the ribcage during this exercise.
Many retract/depress the shoulder blades when they bring the attachment towards their face, and then make the mistake of keeping the shoulder blades there when extending their arms.
To repeat: the shoulder blades should move around the ribcage.
I like to tell trainees they should feel a slight/subtle “stretch” when extending their arms out in front.
Face Pull Variety
For those who do like to keep things interesting, here are two Face Pull variations you may like.
It looks all inane, simple, and easy and stuff…but this one is a lot more challenging than it looks.
This will fire up everything on the backside of the shoulders and is superb at improving strength of the upper back and posterior cuff.
Face Pull w/ Band Abduction
I stole this one off Dr. John Rusin
and started experimenting with it recently. This is another variation that will really fire up the posterior cuff and strengthen the entire upper back.
Programming Tidbits
I try to include one form of rowing variation in just about every training session – yes, even on lower body days – with the bulk of my clients/athletes.
Face pulls, and rowing in general, are one of those things most people can’t perform enough of. To wrap things all in a nice little bow, I’m all about the “feel” of this exercise and am not entirely concerned with going very heavy.
To that end, I do prefer high(er) reps with Face Pulls and will often opt for 3-4 sets of 10-2o repetitions 2-4x per week. I tend to stick with using them as a stand alone exercise towards the end of a training session, but am also a big fan of pairing them with squats/deadlifts/bench press and performing them with EVERY set (even warm-ups).
It serves as a great way to ramp up rowing volume, but because they’re a relatively low-grade, non-aggressive exercise, they won’t compromise performance of subsequent sets of the big 3.
A few weeks ago I presented at the Spurling Spring Seminar up in Kennebunk, Maine. The first presenter of the day, Portland based physical therapist Noah Harrison, blew me away with his talk on muscular tension.
Honestly, the only way his presentation could have been better is if he somehow included a pair of nunchucks.
Or a t-shirt cannon.
His message resonated with me and after he spoke I asked if he’d be interested in summarizing his thoughts in an article for my site. He was more than happy to oblige.
There are two aspects to what dictates the strength of a muscle; how big it is and how hard it can contract at any given moment, with any given movement. Keeping that in mind there are then two ways you can train a muscle to become stronger:
Make it bigger and give it more leverage.
Teach it to contract harder by creating more tension.
While hypertrophy obviously has its use, there are times our goal is simply to increase strength without having to buy a new wardrobe, or jump a weight class. There are also times we have a little more strength in our muscles as they already are, and it is simply a matter of getting them to work fully in the moment.
This article is about ways in which you can train your muscles to fire a little (or a lot) harder, instantaneously, and apply it to nearly any exercise you are performing.
Yes, you can practice tensing your muscles like a body builder during “X” movement, and if an EMG was attached to your area of focus it would read a spike.
The problem with consciously focusing on flexing your muscles during a movement is that this does produce increased tension locally where you are focusing, but often times at the expense of your performance. Quite often tensioning your muscles consciously while moving will result in you simply working harder, moving slower, and experiencing premature fatigue (1).
So how do you get your muscles to pump out more power without destroying your performance?
Simple: you will not do it consciously.
Instead you will do it reflexively. You will use the reflexive reactions you already have.
What I will map out are three body areas/actions that you can focus on with any given activity, and depending on what you do with these areas/actions will either elicit a reflexive increase or decrease in body wide muscular tension.
Again, this article will solely focus on increasing muscular tension.
The three areas/actions are:
What you do with your breath.
What you do with your hands.
What you do with your face.
Now there is no better place to begin talking about changing bodily tension than talking about…
What You Do With Your Breath
The general rule is that if you want to increase muscular tension then either hold your breath or forcefully exhale.
The latter, a forceful exhale, is preferred.
Why?
First, let’s look at what is happening with both these situations.
In one case you hold your breath and barrel down (a valsalva maneuver) and in the other you forcefully exhale through resistance. In both situations you are jacking up your intra-abdominal pressure (IAP), which is necessary to keep your trunk stiff and give your limbs leverage with anything difficult.
Core strength is pressure production, and if you want to be strong, you need to be able to make a lot of it.
However the valsalva maneuver (VM) has a few significant draw backs. The most notable is that you really cannot do many repetitions this way. One rep, maybe, but once you get to two or three repetitions deep into an exercise you will need to breathe.
The second drawback is that a VM is associated with some negative cardiovascular effects, including a sharp increase in your heart rate, blood pressure, as well as an increased risk of cerebral hemorrhage (2). Again, if it doesn’t kill you, holding your breath is going to gas you quicker than necessary.
The third problem is that a VM is associated with an increased risk of incontinence in certain populations (3, 4), which is not desirable if you or your client is trying to be active. Nobody, regardless of what Adam Sandler says, likes to pee themselves, and especially in the middle of a fierce effort.
Performing a forced exhalation (FE) has none of these issues, and has been shown to be as equally effective at spiking your IAP as a VM (2).
Additionally, a forced exhalation has been shown to increase the activation of your abdominal wall (5), is as effective at stiffening the trunk as bracing your abdominals (6), and even result in an instantaneous increase the strength of your grip and several large muscle groups throughout the body (2, 7).
We all know that a tight midsection is necessary to keep the body from crumbling during a strenuous task, but the take home from this should be to focus less on bracing your abdomen consciously.
Just forcefully exhale with the movement, and the abs will kick in automatically.
You have to breathe anyway; you may as well make it work in your favor. The general rule is to exhale with effort, and ingrain it with the movement you are performing.
How do you ingrain it? Every movement has a sticking point, you simply exhale through it.
See the video below for a demonstration of how to ingrain this into any exercise.
What You Do With Your Hands
This one is pretty simple.
If you want to increase body wide muscular tension, maximally tense your hands, preferably in a fist. If you are holding something, grip it hard (very hard). As a result, the rest of your body will “grip” harder as well.
In matters of strength, this is very convenient, because very often we are gripping something and either trying to move it (A barbell, dumbbell, kettlebell, etc) or ourselves around it (a pull up or dip bar). Simply aim your attention on what you are already doing.
How or why does this work? It probably comes down to both the law of irradiation, and how your cerebral cortex is organized.
Irradiation is a principle stating that the activity of a group of muscles will have a ripple effect on its neighboring parts (8). Meaning as you clench your hand harder, not only does your forearm tighten up, but your whole arm and shoulder does as well.
Grip even harder and your whole torso will become engaged. If you are not already trying this I encourage you to begin.
This has actually been measured, as research has shown that the harder you grip your hands, the harder your rotator cuff fires (9, 10). This is convenient, because if you are gripping a hold of something you would really like your shoulder to grab a hold of your body as well. Not only does gripping effect your shoulder, but your body as a whole; postural stiffness will increase the harder you grasp an obect (11). The utility of these reflexive responses with any pressing movement should go without saying.
So that is one factor, how about the second; your brain?
Well what is known is that there is a very large sensory and motor representation of both your hands and your face in the brain. Google “Homunculus Man” and you will see a model representation of this. It is a distorted image demonstrating the density of neurons in our cerebral cortex as it relates to sensing and moving our bodies in our environments.
You can think about this as that your brain both perceives and interacts with the world primarily via your face and hands, so whatever you do at these places will reverberate throughout your body.
If your hands are relaxed, your body will be as well. If your hands are tensed, then your brain will take you seriously and give you more juice. And in matters of strength, we all want juice.
So now we come to our third and final place to consider…
What You Do With Your Face
You may have a hard time believing your face matters so much in terms of strength, but it is true.
Do not forget that strange little homunculus man. Remember; your brain thinks the vast majority of you is face and hands. What you do in these places will resonate through your body.
What you do with you face can be further broken down into three factors;
Your eyes.
Your jaw.
Your facial expression as a whole.
Eyes
What you do at your eyes can be thought of as more steering your bodily tension than necessarily jacking it up or down.
It is well established that the body follows wherever the eyes gaze (12).
This means that if you look to the left, you will have a reflexive weight shift to the left, and the same goes for looking to the right, up or down. Although gymnasts, power lifters and weight lifters will use this often to their advantage to drive extension or flexion with a movement, the vast majority of us should stick to simply looking relatively forward with whatever movement we are performing.
So, for maximal tension; fix your eyes when doing something hard, and do not let them wander.
Jaw
Just as the tension in our hands seems to reverberate through our bodies, what we do at our jaws does as well.
No different than our hands, the amount of tension that we hold at our jaw has the ability to increase reflexive activity as distant as our forearms and calves (13, 14).
Yes you read that correctly; clench your jaw and your forearms and calves will fire harder. In fact, clenching your jaw has been shown to improve your athletic performance across varying endeavors, including a back squat and vertical jump (15, 16).
I would advise caution with this (and for some a mouthpiece), as some people have trouble relaxing their jaws then necessary engaging it. Other people may not have a fully congruent bite, and heavily clenching may cause more of a problem than a help.
Simply focus on setting your jaw and keeping your teeth touching firmly when you need more muscular effort.
Facial Expression
Think about it: setting your eyes and jaw is pretty much a game face now isn’t it?
Besides focusing on where your eyes look and keeping your mouth shut, it is common sense to be serious during a heavy or difficult lift.
Laughing is completely out, as it has been established that there exists a body-wide inhibition of muscular tension for up to 45 minutes after a bout of laughter (17, 18).
So, save the jokes for after the work is done.
Putting It All Together
Here it is; the meat and potatoes of it all.
If you want to increase body wide muscular tension, then simply:
Exhale with resistance.
Clench your fists.
Fix your eyes.
Set your jaw and be serious.
This comes down to learning to place your mental effort on these choice few factors with whatever challenging movement you are performing.
By doing this you set yourself up for the best chance at eliciting the highest potential your muscles and body as a whole has in that given movement, on that given day.
Integrate this into your training, and you will likely find that you become stronger not simply because your muscles have grown, but because they have learned to work together, better.
Enjoy!
[List of references below]
About the Author
Noah is a Physical Therapist and Strength Coach based out of Portland, Maine.
He is the owner of Portland Integrative Physical Therapy, through which he provides one-on-one musculoskeletal rehabilitation with a holistic, full body approach.
Noah has extensive training in a variety of rehabilitative approaches, and combines this with progressive strength training in order to build and restore strong and capable individuals.
Makaruk, H, Porter, JM “Focus of Attention for Strength and Conditioning Training” Strength and Conditioning Journal Feb 2014, 36:1 16-22
Ikeda, ER, et al “The Valsalva Maneuver Revisted: the Influence of Voluntary Breathing on Isometric Muscle Strength” J Strength Cond Res 2009 Jan: 23(1): 127-132
Nitti VW, et al “Correlation of Valsalva leak point pressure with subjective degree of stress urinary incontinence in women” J Urol 1996 Jan; 155(1): 281-5
Peschers UM, et al “Difference between cough and Valsalva leak-point in stress incontinent women” Neurourol Urodyn 2000; 19(6): 677-81
Ishida et al “Maximum expiration activates the abdominal muscles during side bridge exercises” J Back Musculoskeletal Rehabil. 2015; 27(4): 481-4
Ishida et al “Comparison between the effectiveness of expiration and abdominal bracing maneuvers in maintaining spinal stability following sudden trunk loading” J Electromyogr Kinesiol 2016 Feb; 26: 125-9
Li S, et al “Forced ventilation increases variability of isometric finger forces” Neurosci Lett 2007 Feb 2; 412(3): 243-7
Gontijo LB, et al “Evaluation of Strength and Irradiated Movement Pattern Resulting from Trunk Motions of the Proprioceptive Neuromuscular Facilitation” Rehabilitation Research and Practice Volume 2012, 6 pages
Sporrong H, et al “Influences of handgrip on shoulder muscle activity” Eur J Appl Occup Physiol 1995; 71(6): 485-92
Sporrong H, et al “Hand grip increases shoulder muscle activity, an EMG analysis with static hand contractions in nine subjects” Acta Orthop Scand 1996 Oct: 67(5): 485-90
Ustinova KI, et al “Postural stabilization by gripping a stick with different force levels” Gait & Posture 2013 May: 38(1): 97-103
Ivanenko YP, et al “Effect of gaze on postural responses to neck proprioceptive and vestibular stimulation in humans” Journal of Physiology 1999; 519(1): 301-314
Takashi T, et al “Modulation of H reflexes in the forearm during voluntary teeth clenching in humans” European Journal of Applied Physiology 2003 Nov; 90(5-6): 651-3
Miyahara T, et al “Modulation of human soleus H reflex in association of voluntary clenching of the teeth” J Neurophysiol 1996 Sep; 76(3): 2033-41
Ebben, WP, et al “Jaw clenching results in concurrent activation potentiation during the countermovement jump” J Strength Cond Res 2008 Nov; 22(6): 1850-4
Ebben WP, et al “Kinetic analysis of concurrent activation potentiation during back squats and jump squats” J Strength Cond Res 2010 Jun; 24(6): 1515-9
Paskind, J “Effects of laughter on muscle tone” Arch Neurol Psychiatry 1932; 28: 623-8
Overeem S, et al “Is motor inhibition during laughter due to emotional or respiratory influences?” Psychophysiology 2004; 41: 254-8
There are no “hacks” to getting strong. I’m a firm believer you get out of it what you put in.
It’s hard, and it takes a lot of hard work; oftentimes over the course of several years.
That said, below are a few “quick” tips that can help expedite the process. Admittedly there’s nothing profound or elaborate included, but I felt it important to suggest things that are easily accessible to the bulk of people who read this site.
Hope they resonate and help.5 Quick Tips to Increase Strength
1. WARNING: Captain Obvious suggestion of the day: Creatine
It still dumbfounds me to think there are people out there who train on a consistent basis, yet are still not taking creatine (and yes, this includes you as well ladies). It’s the most researched supplement in human history and it’s efficacy has been proven time and time again.
*It’s safe
*It works
*It’s NOT steroids
Just take five grams of creatine monohydrate (no need to buy the expensive brands that are laced with rocket fuel) per day and that’s that.
ADDENDUM: This is a suggestion. Not mandatory. The first step to addressing lack of progress is to audit your program and nutrition. If those two factors aren’t getting the job done, no one supplement is going to be the panacea.
That said, you still need to go train like a savage. Taking creatine alone isn’t going to mount to much.
2. Deadlift Barefoot
Everyone who trains with me here in Boston is told to take their shoes off when (s)he deadlifts.
To quote a new client I started with the other night
“Why?”
BECAUSE I SAID SO. HOW DARE YOU QUESTION ME. KNEEL BEFORE ZOD!!
Just kidding.
Well for starters, by taking your shoes off you’re now 1-2 inches closer to the ground, which is 1-2 inches less distance the bar has to travel.
Secondly, and more germane to the point, by taking your shoes off you’re now able to push through your heels. As a result, you’ll recruit more of your glutes and hamstrings to help out.
It’s not uncommon for some people to see a significant increase in how much weight they can pull off the ground from a little more posterior chain recruitment.
Thirdly, people will automatically think you’re badass cause you’re training with no shoes on. Of course, this is contingent on whether or not your feet smell like you’ve been walking through a sewer all day.
In that case, it’s your call.
3. Glute Activation
If your glutes aren’t able to fire full throttle, the hamstrings and lower back have to do more work than they’re accustomed to doing.
So from that standpoint paying more attention to glute activation can have positive repercussions for those suffering through chronic low-back pain.
However, people often forget the badonkadonks are not only the body’s dominant hip extensor which play a key role in athletics and strength, but are also a fairly large muscle that’s aesthetically pleasing to look at (cue obligatory fitness Insta-celebrity pic here).
Don’t worry, I got you too ladies:
By “turning on” the glutes with some simple activation techniques beforehand, you will undoubtedly be able to handle more weight when you squat and/or deadlift.
To that end, while I don’t have any PubMed research articles to back this up, more weight=more strength=more people want to see you naked.
Here are some of my favorites:
Up 2, Down 1
I like this variation because it allows for more eccentric overload on the lowering leg. Obviously one will need to master the two-legged variation first, but this is a nice progression to consider.
Band Resisted 1-Legged Hip Thrust
This is an ingenious variation I stole from Dean Somerset. If you’re looking to progress you’re 1-Legged Hip Thrust and having a hard time figuring out a way to do so, give this a try.
Creepy McCreepypants Frog Pumps
Popularized by none other than Bret Contreras, Frog Pumps are another fantastic exercise that aid in getting the glutes nice and juicy.
Thing is, they’re awkward as fuck to perform in public.
So, there’s only one way, and one way only, to perform them….
…..by copying Bret and Dr. John Rusin’s lead and making direct, intense eye contact with someone and making things creepy AF.2.
Reps can range anywhere from 15 to infinity.
4. Stop Testing Strength and Build It
I’m not the first to say this.
Many other coaches stronger than I – Chad Wesley Smith, Greg Robins, Julia Ladewski, Pavel, to name a few – have reverberated this quote on repeat throughout the years.
Far too often trainees head to the gym week in and week out and “test” their lifts rather than actually build them.
Now, mind you, lifting heavy things (90% + of 1 rep-max) is a non-negotiable factor to getting strong. However, as I noted in THIS blog post sub-maximal training (I.e., predominately using loads in the 65-85% range) is much UNDER-valued component to strength training.
In other words: loads in those ranges help one to BUILD strength.
Moreover, utilizing more sub-maximal training – while having an obvious muscle building effect (bigger muscles often equate to more force output) – also allows trainees to hone their technique and to get into (and maintain) proper positions to exhibit their strength more effectively.
5. Use Novelty Sparingly
Unlike coaches Dan John or Mike Boyle, I don’t find myself to be a very quotable person.
However, I am proud of this one:
“Look, I’m not bashing exercise variety. Variety has a time and place. However, the greatest gap in most people’s training isn’t lack of novelty, but rather lack of mastery.”
Many trainees have what I like to call “Squirrel Syndrome” when it comes to working out.
They start doing an exercise (or in most cases start an exercise program) and before they’ve put down the dumbbell on their first set they’re distracted by a new “squirrel.”
In this case the squirrel is an entirely new exercise program or a bright, shiny, new exercise.
– “Jumping Jack BOSU Bicep Curls?”
– “Sweet Christmas, I need that in my life.”
Want to get stronger?
Stop hopping exercise to exercise or program to program. It’s almost impossible to see steady progress if you’re heavy-handed on the novelty.
I like Jim Wendler’s approach to programming for strength:
“The boring shit works.”
Observe anyone who’s strong or has a physique you admire and almost always they’re doing very vanilla things in the weight room.
Contrarily, watch most other asshats who cry afoul about hitting their genetic ceiling3(or something equally as lame):
Now, before people reach for their pitch forks, or, I don’t know, call their local IPF director to blacklist me, let me be clear: this is not an attempt or diatribe to dissuade anyone from back squatting.
I like back squats.
Back squats are awesome.
I still have my clients back squat (and perform the exercise myself, even though the video below is of me using a Safety Squat Bar).
The irony here is that I used to hate front squats. Almost as much as I hated Jillian Michaels’ kettlebell swing tutorials.
On a scale of 1 to 10 (1 being a tickle fight with Gizmo from Gremlins and 10 being feeling like you’re getting choked out by Chuck Liddell) front squats were around an 8 for me.
Whenever I did them they always felt, well, unpleasant.
They didn’t hurt or cause physical pain or anything. They just, you know, sucked a bunch of donkey balls whenever I did them.
So I didn’t.
Then I had an epiphany of sorts:
I noticed that once I hit 40 back squats weren’t feeling all that spectacular. I found my hips and low back weren’t tolerating the consistent loading and it took longer to recover.4
I had always been slow off the floor with my deadlifts and wondered if it was due to lack of quad strength (pushing away from the floor)? After listening to Chad Wesley Smith pontificate on the topic and mention how much of a fan he was of front squats to help with this issue, I was sold.
I needed to stop being such a pussy.
So I made a concerted effort to prioritize front squats in my training.
And wouldn’t ya know…
I started getting better at them. They sucked a little less. And some good things happened.
2. Fast Forward a Few More Months…I Finally Hit a 600 lb Deadlift
But, Tony, Why Should I Front Squat? It’s Not All About You. Gosh.
1. They’ll Likely Feel Better
Again, I want to remind anyone who’s contemplating throwing their face into their keyboard at the mere hint of me suggesting people not back squat….
…….that’s not what I’m saying.
We’re on the same team.
However, there’s likely a fair number of you reading who have had a rocky time with back squats. Or maybe you have a client who’s lived through a maelstrom of on-again/off-again relationships with them?
Hey, it happens…and there’s nothing wrong with it.
Back squats aren’t bad, and front squats aren’t some end-all-be-all panacea.
In fact, front and back squats are more similar than they are different – both require massive amounts of strength/stability in the hips and core, as well as requisite “access” to hip flexion, knee extension, and ankle dorsiflexion – so I really see little need to get all territorial about which one is better.
In the end, as far as which is better, it depends. It depends on someone’s goals, preferences, anthropometry and injury history.
I will say this: Unless you’re a competitive powerlifter (or just solely interested in lifting as much weight as possible), no one has to back squat.5
It’s my opinion, though, that for most people, most of the time, given most goals (and taking into account the cost-benefit of exercise selection) front squats will likely be the best option and better fit.
For those reading who, while respecting anecdotal examples, are more keen on evidence-based data, I’d point you towards the renowned Gullet, et al study – A Biomechanical Comparison of Back and Front Squats in Healthy Training Individuals – which compared EMG activity between the two variations.
Are they dramatically different? Nope.
This study compared 70% of 1-rep max of the back squat to 70% of 1-rep max of the front squat and showed that EMG activity on the quadriceps, hamstrings, erectors, even the eye lids were overall the same.6
Biomechanically speaking most people can back squat more than they can front squat, so 70% of back squat was heavier than 70% of front squat in the study.
However, as Dr. Mitch Babcock pointed out in a recent video of his I watched:
“If someone has a compressive type problem (knees achy, maybe their spine feels like linguini)…we can get equal EMG activation with less load by utilizing front squats”
Some trainees may think their world is going to end and that they’ll lose strength in their back squat, but hopefully you can see the value in leveraging the above information.
We can still elicit a high training effect on the legs with front squats.
2. Front Squat = Deeper Squat
There’s a massive caveat here.
A deep squat isn’t always better nor is it something that should be the end-goal of every individual.
Please read THIS post for a little more detail on the topic.
That being said, because of the bar placement (anterior on the shoulders) and because one is able to maintain a more upright torso during its execution, most people will be able to achieve a much deeper depth with a front squat.
Why is this good?
1. The internet trolls won’t judge you as much.
2. A deeper squat = more glute max recruitment.
I like to use this tidbit of info with many of my female clients who are a little more badonkadonk obsessed compared to their male counterparts.
Thanks in no small part to Bret Contreras and his popularization of the hip thrust, many women (guys too) have been placing more emphasis on their derriere in recent years.
That being said, there has been a trend of late where many women perform only hip thrust (as well as a cornucopia of band exercises – band hip abductions, kickbacks, side raises, lateral stepping, etc) to target their glutes.
[My good friend Lee Boyce noticed this trend too and wrote about it HERE.]
If you want glutes perform your hip thrusts and the litany of other exercises that target that area. However you still need to build them with some good ol’ fashioned strength training.
Front squats can help immensely in this department.
3. Better Posture
I saved the boring one for last.
Come on, if I started with posture this would have happened:
This will be short.
Front squats nudge people into more thoracic extension which is going to be a game changer in terms of helping to improve posture.
As you descend closer to the ground you have to “fight” to keep from folding over. In many ways the proper execution of the exercise itself is self-coaching.
If you don’t maintain thoracic extension the barbell rolls off your shoulders.
At this point it’s common knowledge that the “experts” online have hijacked the attention of the public.
While conflicting and generally poor fitness advice has flooded the internet to confuse the public, one area that even sound coaches and trainers talk out of both sides of their mouths is the relationship between training and sleep.
On many occasions, I have heard live coaches (myself included) or coaches I follow online give the “wake up earlier to get the work done” speech and then five minutes later hit the same person with the “well you aren’t getting enough sleep” speech to explain lack of progress, chronic fatigue, or generally feeling like shit at the gym and beyond.
Most people can’t do both.
If a coach spews this advice at a parent of an infant or toddler or an accountant trying to meet a deadline during the peak of tax season, you can bet it’s going to fall on deaf ears.
Getting nine hours of uninterrupted sleep and getting up at 5am to get a workout in is about as likely as Tracy Anderson entering a powerlifting meet, it isn’t happening, and even if it does, that training session won’t be pretty.
Sleep is important, getting the work done is important. It takes balance. The best program ever written is a total waste of time if you can’t recover from it.
As usual, the answer is in the grey area. If you aren’t getting enough sleep, training needs to be scaled back in terms of volume, intensity, or frequency. If you are especially sleep deprived, dialing back two of those three variables may be necessary to optimize your results until you are able to get more shut-eye.
Even if you are getting the required nutrition to support your frequent and intense bouts of training, you WILL be stuck in neutral if you aren’t getting sufficient sleep.
The Importance of Sleep
We know that as Americans, we simply don’t sleep enough. In fact, according to a Gallup poll from a few years back, 40% of Americans are sleeping less than 7 hours per night.
While busy lifestyles, work schedules, and raising kids contribute to this lack of ZZZs, two underrated factors may be:
The brilliant Netflix feature that rolls the end of an episode directly into the next one in 5 seconds.
The graphics, sound, and online capabilities of the Call of Duty franchise has gotten totally insane.
Regardless of the root of the issue, this lack of sleep will wreak havoc on your production in the gym especially if your training sessions are frequent and intense.
Sleep deprivation will not only sap energy from your lifts, it will negatively impact you on a hormonal level by decreasing the release of testosterone (1) and increasing cortisol (2), an especially nasty combo when trying to gain strength, muscle mass, or lose body fat and even worse for males interested in having sex past the age of 35.
Furthermore, if you add quality sleep, you’ll have a much better chance at performing optimally in the gym (3). We know we need more sleep, but how?
How Do We Sleep for More Muscle?
A general rule of thumb is getting 7-9 hours of sleep per night to recover from training and support your effort in the weight room.
It’s important to note, however, that not everyone is going to be able to follow that advice 100% of the time.
Sometimes you are simply in a period of life (new baby, starting a new business, etc.) that doesn’t lend itself to a lot of sleep. While training is still encouraged under these circumstances, going balls to the wall with exercise is going to end up wasting time, effort, or causing injury.
Want a more restful night of sleep? Try implementing a couple of these tips to take advantage of all the benefits a great night of rest can provide.
1. Go to Bed Earlier
Common sense? Absolutely.
It’s also the easiest tip to implement and will yield the best results. I bet if there were some snazzy Instagram videos of shredded guys and girls going to bed at 9:30 on a Friday night, it would be a more popular thing to do.
2. Put Down the Screens an Hour or Two Before Bed Time (but after you finish this article).
This includes TVs, phones, laptops, iPads, and video games. The blue light from these popular devices is used to keep us alert and engaged. Helpful when writing a thesis, not so much when scrolling social media directly prior to bed. Blue light at night will completely disrupt the human body’s natural circadian rhythm hampering our ability to get a good night’s sleep. Put devices down a few hours before bed (out of arms reach), dim the lights, and read an actual paper book or magazine. Yeah, those still exist.
3. Stay Away From Caffeine in the Afternoon
Caffeine is glorious.
Its awakening effect has helped mankind move mountains, part seas, and beat deadlines. If it’s ingested too late however, it may affect sleep. Caffeine can stay in our system for up to 6 hours(4) so nix the 3pm cup of coffee used to finish strong at work.
Be careful of sneaky caffeinated items such as chocolate, soda (diet or regular), and even decaf coffee.
4. Avoid Alcohol
While this tip won’t win me a popularity contest, it simply must be stated. That glass or four of wine in the evening may help you cope with the shitty day you had and help you fall asleep faster (read: pass out), but it isn’t doing anything for your quality of sleep .(5)
With alcohol on board, it’s a good bet that the later stages of sleep most crucial for recovery from tough training will be disrupted. As usual, alcohol and progress in the gym simply don’t mix, use sparingly.
5. Your Bed is For Humans
Maybe it’s cold-hearted but the cats and dogs need to get kicked out of your bed.
How many times have you been woken up by your pet?
Think about it this way, every single time they move or nudge you, waking you up, you’re starting at square one of the sleep cycle. How are you going to reach the restorative stages of sleep if every 20 minutes Fido shoves his ass in your face?
If that doesn’t get you to train your pet to sleep in their own designated bed, ask yourself this question: would you let your spouse walk around outside all day on their bare feet and then climb into your clean bed with no bath or shower?
Doubtful!
About the Author
Tim is an exercise science graduate and CSCS who has been training in Baltimore MD for over 14 years. While his specialty is body composition, he has extensive experience working with clients from young athletes to cardiac rehabilitation patients. Tim has been published in a variety of fitness publications and writes for his blog when he isn’t helping clients in person.
Being a former fat boy, Tim developed a deep seeded passion for training and nutrition in his teenage years after a major body transformation. This passion is what drives him to seek the best results for his clients and readers. Tim combines a knowledge base earned from years of practice in the field, research, and time spent under the bar with practical advice to get his clients to the next level.
You can find Tim on Instagram (HERE) or his blog (HERE).
NOTE:This post is a bit of a face-lift from a similar post I wrote last year.
I’ve noticed a growing trend in recent months in the fitness community and it’s something that’s been grinding my gears.9
It seems it’s become trendy or a “thing” for some (not all) people to bash certain exercises – specifically, from a more general standpoint, lifting appreciable weight – due to the stress it can cause. I’ve been noticing this trend a lot in the comments section of this site and in the comment sections of other training forums I frequent. It’s certainly not at pandemic levels or anything, but it’s happening enough where I felt compelled to get a little ranty today.
“Don’t do this exercise because it’ll stress your knees.”
“It’s probably best to avoid lifting heavy weights because it’ll stress your joints and back.”
“You shouldn’t do “x” or “y” because it’ll cause too much stress.”
Blah, blah. blabbidy, blah, blah.
Now, let me preface everything by saying I understand it’s not everyone’s goal to get strong(er), hoist barbells and dumbbells every which way, and/or, I don’t know, make people clench their sphincters when they watch you bench press.
It’s not everyone’s bag, and that’s cool.
Likewise, any conversation of this magnitude should come with the assumption that whatever exercise or modality we’re referring to – squats, overhead pressing, juggling chainsaws – is, in fact, an appropriate fit for someone based off their goals, ability level, taking into account their current/past injury history, and individual anthropometry.
Moreover, we can make the case for any exercise having an inherent risk, if not tinkering on the edge of dangerous, if it over-steps someone’s ability level, is performed incorrectly, and/or is done with too much volume.
A newbie performing conventional deadlifts on Day #1 probably won’t be a good fit.
A heavy back squat performed with an excessively rounded back = stop blaming the exercise and fix your technique, Sherlock.
Even if someone has immaculate dynamic control of their rotator cuff, spends time addressing soft-tissue quality, and also stays on top of their ability to upwardly rotate their scapulae, even if they do all of that (which is saying a lot), the acromion space will always narrow when you overhead press. Doing too much of it (volume) can still cause shoulder issues.10
That said, it’s not lost on me there’s a heavy bias on my end given I’m a strength coach. I like getting people strong. It’s what I do and it’s what I’m about.
Well, that, and crushing ice-cream.
And still trying to figure out why Carrie broke up with Aidan in Season 4 of Sex and the City.11
I have rarely found anything negative that results from getting someone stronger; whether we’re referring to helping an athlete perform better in his or her’s respective sport, helping a grandmother be able to carry her own groceries, or helping anyone be less fragile.
Everyday life is filled with trials, tribulations, tripping over Legos on the carpet, and general levels of shitstormery. What harm can come from getting stronger and to be better equipped and prepared for it?
Yet, time and time again I witness people’s backlash towards strength training – or any sense of straining – by using the excuse “it’s too much risk at stressing the body.”
Ummmmmm.
The point of exercise, and more specifically, lifting weights, is to stress the body.
Strain, effort, and yes, even some level of discomfort is warranted, nay, needed, in order to make the body more resilient and ready for sport AND life.
I’m not making this stuff up either.
There are laws (meaning, proven, undeniable facts backed by science) to back me up:
BOOM
Wolff’s Law – States that bone in a healthy person or animal will adapt to the loads under which it is placed.
As a corollary to Wolff’s Law there’s also the term known as Minimal Essential Strain (MES) which also states there’s a threshold (strain) that must be reached and repeated often enough to signal to the osteoblasts to travel to the area of strain and lay down collagen to increase the strength of the bone.
Davis’s Law – Describes how soft tissue models along imposed demands.
I-Just-Threw-My-Face-Into-a-Brick-Wall-Because-I-Became-Dumber-For-Having-Listened-To-What-You-Just-Said Law – Describes the spontaneous reaction that results when someone says something stupid.12
We can’t always live in a bubble or “safe space” filled with non-threatening exercise, pink dumbbells, and Adele radio playing on Pandora.
It behooves us to teeter with end-ranges of motion and to sometimes tinker with someone’s ability to just do more.
Lets take the squat.
A common argument against it – again, for some, not everyone – is that it should be avoided because it stresses the knees.
Well, when done incorrectly I’d agree.
There’s much that can go awry with the squat.
However, some trainers/coaches take it to delicate flower levels that I can’t begin to comprehend. To the point where, if there’s any deviation from perfect, they’ll start hyperventilating into a paper bag and shut the set down faster than you can say “When’s Season 3 of Stranger Things coming out?”
Sometimes you have to let people figure things out for themselves and stop over-coaching.
The knees caving in isn’t always bad.
“Caving” to neutral is a lot different than actually falling into knee valgus.
Don’t be so quick to pump the brakes on people.
Hell, the point of someone going to physical therapy is to do something physical. Those therapists who tend to get the best and most efficient results tend to be those that include strength & conditioning to compliment the clinical side of the equation.
If you’ve done your job as a coach and properly progressed your clients/athletes it’s okay to allow them to deviate from perfect. It’ll help them in the long run.
I’d make the case it’s beneficial to allow people to experience compromising positions anyways. That way they’ll know how to get out of them if or when they happen again (and they will).
It’s imperative to make the body do more work in order to adapt and make progress. To steal a quote from Nick Tumminello:
“It’s all about creating STRESS (to stimulate adaption) W/O DISTRESS (that exceeds one’s tolerance and causes injury).”
If you missed Part I of Dr. Licameli’s guest post, you can check it out HERE. Now, you could read today’s post and get the gist of what was said yesterday, but you run the risk of missing out on some nitty-gritty details.
Kinda like watching Blade Runner 2049.
You could watch it without watching the original, but you’re missing out on some important context.
*** This is the part where’d you know what points 1-4 were all about.
5) Don’t Push Through Pain…Not All The Time, Anyway
There is good pizza and there is bad pizza. There is good pain and there is bad pain. Differentiating the difference is of utmost importance when training the shoulders.
We’re not talking about delayed onset muscle soreness (DOMS), which is felt 1-2 days after training.
We’re talking about pain during training.
What follows are some guidelines to help you navigate your way through pain.
KEEP IN MIND, THESE ARE GENERAL GUIDELINES. IF YOU HAVE PAIN, BE SURE TO SEE A QUALIFIED HEALTHCARE PRACTITIONER!
I stress finding a qualified healthcare practitioner. A qualified healthcare practitioner will explain all of this, in addition to providing several options to keep you training while recovering from injury.
Let’s face it…not all physical therapists have spent much time under a bar. Some have spent time at the bar or even at barre class, but many have no experience or expertise in weight lifting or bodybuilding. You deserve your goals to be taken seriously. You deserve more than things like, “stop squatting for 4 weeks” and standing internal and external rotation with a band to “strengthen” the rotator cuff…or is it rotator cup…no, it’s rotary cuff…rotary club!
That’s it.
Characteristics of good pain:
-How Does It Feel?: Muscle burn; usually symmetrical right to left.
-Onset: Gradually increases as the set progresses.
-When Does It Stop?: At the completion of a set.
Characteristics of bad pain:
-How Does It Feel?: Sharp, numb, tingling; intensity may be asymmetrical right to left.
-Onset: Quickly; may be felt after only the first few reps
-When Does It Stop?: Days, weeks, months…; stays well after the set is completed, however may also end at the completion of a set.
If you find yourself experiencing bad pain, it may not be the end of the world. Bruce Lee also said, “Be like water.”
Water has the flexibility to take the shape of whatever container it is placed in, while still maintaining its identity…water.
In a similar way, our training can be modified without losing its identity or effectiveness. Try to modify your training. Sharp pain when pressing overhead with a barbell? Try a landmine press. Unable to perform a reverse flye? Try a face pull. Keeping the same exercises and modifying training volume may also do the trick.
6) Don’t Overdo It With The Classic “Rehabilitation” And “Injury Prevention” Exercises. There Are Hidden Benefits In Some Classic Movements.
It is no one’s fault but our own that, as a profession, physical therapy has a certain reputation when it comes to injury and injury prevention. The misconception is that in order to reduce pain or prevent injury, a hefty dose of classic “rehabilitation” exercises need to be added into an already packed training regimen.
For me, and many out there like me, gone are the days of separating “therapeutic exercise” from “regular training.” Say goodbye to blocking off a half hour pre and post workout to foam roll and perform straight leg raises and clamshells. If you look closely, you can find what you need for healthy shoulders right there in your existing training routine. Here are some examples:
Face Pull: Trains scapular retraction and external rotation. Great for scapular stability, rotator cuff strengthening, and balancing out internal vs. external rotation.
Farmer Carry/Overhead Carry: Excellent way to train postural, scapular, and global rotator cuff stability, not to mention full body/core strength.
Plank on Ball with Protraction and/or the Ab Wheel: Great way to dynamically train serratus anterior, core stability, and scapular stability.
Plank with Band Around Wrists with Protraction: Great way to train external rotation as well as dynamically train serratus anterior, core stability, and scapular stability
Landmine Press: With proper scapular movement (more on this to come), this is an excellent exercise to dynamically strengthen serratus anterior and improve scapular neuromuscular control.
Pull-up/Pull-down: With proper scapular depression at the initiation of the pull, this is a fantastic exercise to target the lower traps, which play a key role in scapulohumeral mechanics. Full range of motion and a long eccentric will also help lengthen the lats, which can limit shoulder mobility.
Squats/Deadlifts: Train “shoulder packing” position. A proper warm-up prior to these lifts will also include thoracic mobility work.
Seek out experts like Tony Gentilcore (obviously), Andrew Millett, John Rusin, Jeff Cavaliere, Quinn Henoc, Mike Reinold, Mike Robertson, Eric Cressey, Dean Somerset, Zach Long, Joel Seedman, Ryan DeBell, Teddy Willsey, and many more.
But if you have pain, GO SEE A QUALIFIED HEALTHCARE PRACTITIONER FIRST!
7) Symmetry…Don’t Forget External Rotation and Thoracic Mobility
As previously mentioned, weightlifters tend to be very “internal rotation dominant,” and for good reason.
Let’s look at the muscles that internally rotate the shoulder.
Just to name a few: pec major, lats, subscapularis, teres major, front deltoid.
Let’s take a look at the muscles that externally rotate the shoulder: infraspinatus, rear deltoid, teres minor.
The muscles that internally rotate the shoulder are of greater number and greater size (the pecs and lats are two of the strongest muscles of the upper body). The external rotators are less in number and much smaller. Give those external rotators a fighting chance to create some balance! Don’t neglect them!
It’s important to note that just performing an equal amount of presses and rows/pull-downs will not improve shoulder rotation symmetry because, as previously mentioned, both the pecs and the lats internally rotate the shoulder. So even though pull-downs and rows are “back” exercises, they still train the lats and therefore still train internal rotation.
Some of my favorite exercises to train external rotation are face pulls, W raises/pulls, reverse flyes with external rotation bias, wall slides with a band, and planks with a band around the wrists.
Adequate thoracic mobility is crucial to optimal shoulder function. If the scapulae are the foundation of the shoulder, the thoracic spine is the ground on which the foundation is built.
Thoracic mobility should be included in almost every warm-up, regardless of the body part being trained. One of my favorite thoracic mobility exercises is a kneeling protraction sit-back into a lat stretch with deep breathing. Be sure to check out this video of a sample lower body warm-up routine that includes this exercise.
8) Don’t Pin Down The Scapulae
It happens all the time.
An idea comes out and soon gets morphed into an extreme.
“Dynamic stretching may be better than static stretching pre-workout” turns into, “Don’t ever do static stretching because it’s a waste of time.”
“Foam rolling may help improve short-term soft tissue restriction and range of motion” turns into “I have to foam roll for 30 min when I wake up as well as pre workout, post workout, and before bed in order to break up adhesions and prevent injury.”
The idea of “shoulders down and back” seems to have experienced a similar course. Yes, keeping the shoulders in a retracted and depressed position with a properly extended thoracic spine will place the muscles, nerves, and joints in a structurally advantageous position as well as open up the subacromial space by about 30%. It also allows for unrestricted overhead shoulder range of motion.
However, the scapulae must move, and they must move correctly. The scapula is the base and foundation of the shoulder and dysfunction can most certainly lead to injury.
Note From TG: Check out THIS article I wrote a while back touching on the same topic; in this case how it relates to performing a DB Row correctly.
Generally, the scapula remains relatively stationary during the first 30 degrees of shoulder abduction (lifting the arm out to the side as in a lateral raise), with the movement coming primarily from the glenohumeral joint. As abduction continues past 30 degrees, the scapula begins to move and the glenohumeral joint and scapulothoracic joints move in about a 2:1 ratio.
This means that at 120 degrees of abduction, the glenohumeral joint has contributed about 80 degrees and the scapula has contributed about 40 degrees. If the scapula remains pinned “down and back,” range of motion will be restricted and the glenohumeral joint will be forced to overcompensate. This dysfunction will likely limit performance and increase risk of injury.
In addition to upward rotation, the scapula also needs to protract (glide forward) during both overhead and pulling movements. Serratus anterior is one of the main muscles responsible for protraction as well as for adhering the concave surface of the scapula to the convex surface of the ribcage. Pinning the scapulae down and back is not what we need…we need controlled, scapular motion.
I’m Done
If at least one person benefits from these tips, I have done my job. My hope is that you will keep these tips in mind and reap the benefits of strong, healthy shoulders. You’re putting the work in, now let’s capitalize on it.
About the Author
Nicholas M. Licameli
Doctor of Physical Therapy / Pro Natural Bodybuilder
Every single thing he does, Nick believes in giving himself to others in an attempt to make the world a happier, healthier, and more loving place. He wants to give people the power to change their lives. Bodybuilding and physical therapy serve as ways to carry out that cause. Nick graduated summa cum laude from Ramapo College of New Jersey with his bachelor’s degree in biology, furthered his education by completing his doctoral degree in physical therapy from Rutgers School of Biomedical and Health Sciences (previously the University of Medicine and Dentistry of New Jersey) at the age of 24, and has earned professional status in natural bodybuilding. His knowledge of sport and exercise biomechanics, movement quality, and the practical application of research combined with personal experience in bodybuilding and nutrition allows him to help people in truly unique ways. Love. Passion. Respect. Humility. Never an expert. Always a student. Love your journey.
The shoulders (delts) are an area that many trainees wish were bigger. They’re also an area that’s often injured. In today’s guest post by Dr. Nicholas Licameli he discusses and breaks down some of his top training tips for shoulder health and hypertrophy.
In order to build a quality and symmetrical physique, all muscle groups must be trained and developed equally. An overdeveloped muscle group can never compensate for an underdeveloped one. That being said, a well-developed set of shoulders, along with a narrow waist, can really enhance a physique and create a nice V-taper.
While the shoulders are one of the most sought after muscles to develop, they also tend to be one of the most stubborn and most commonly injured. Here are my top shoulder training tips to help you on the journey to strong, healthy shoulders.
1) Listen To Your Body
Early in my training career, I remember feeling as if there were some aspects of my training that could not be changed. Compound lifts had to be performed using a barbell only and with heavy, lower rep sets. Dumbbells and lighter/higher rep training were for isolation movements.
For years, I trained in the 6-10 rep range for barbell overhead presses and in the 12-20 rep range for lateral raises, rear deltoid work, and other isolation movements. I never really felt “satisfied” or that “good” fatigue after completing heavy sets of overhead presses.
I eventually took the leap out of my comfort zone and started using dumbbells and a landmine set up for overhead pressing.
What a difference!
I felt a connection to my deltoids like never before. The overhead press soon went from one of my least favorite movements to one of my favorites.
I also started to realize that my lighter warm up sets seemed to feel better (even when not taken anywhere near failure) than my heavier working sets. I took another leap and started training the overhead press in the 12-20 rep range and again, I was blown away at how my body responded. Does this mean I completely removed heavy overhead pressing from my training?
Of course not, but I am definitely not afraid of lighter training.
The take home message here is listen to your body.
If heavy barbell training doesn’t quite “click” for your shoulders, don’t be afraid to change it up.
We now know that if hypertrophy is your goal, overall volume (volume = weight lifted x sets x reps) and progressive overload at an appropriate intensity is what matters.
Note From TG: Technically speaking, for muscular hypertrophy three factors take precedence: Mechanical Tension, Metabolic Stress, and Muscle Damage.
Hypertrophy can be seen by training with heavy weight and low reps as well as light weight and higher reps. Keep in mind that if your goal is strictly to increase strength on the barbell overhead press, you’re going to have to train the barbell overhead press with heavy loads, as specificity is much more important when it comes to strength.
2) Obey Your Anatomy: The Upright Row and Lateral Raise
The upright row seems to have more controversy surrounding it than Donald Trump administering a flu vaccine to a gluten-free, ketogenic, vegan, transgender circus elephant in captivity while drinking creatine sweetened with aspartame.
Is the traditional “muscle magazine” upright row the safest or most effective exercise to build big, strong, and healthy shoulders?
Probably not.
Can it be modified?
Absolutely.
By nature of the movement, the barbell upright row places the shoulder in resisted internal rotation with elevation. This is a less than optimal and, dare I say, vulnerable position because it narrows the subacromial space, which can increase risk of injury.
Does that mean our shoulders will break on the first rep?
No.
Our bodies are resilient and can handle less than optimal positions, but why risk it if we can find a better way? Need a refresher on what the sub-acromial space is and how narrowing it can lead to injury? Check out Tony’s awesome article right here.
Great alternatives to the barbell upright row are the dumbbell upright row and the face pull.
Face Pull
As mentioned above, the barbell upright row puts us into internal rotation, which narrows the sub-acromial space.
External rotation, however, can be a shoulder’s best friend.
The dumbbell upright row frees up our joints and allows us to externally rotate throughout the movement. The face pull reduces the amount of internal rotation at the bottom of the movement and increases the amount of external rotation at the end of the movement.
Many training routines tend to be abundant in internal rotator strengthening (pecs, lats, etc.) while lacking strengthening for the external rotators (posterior rotator cuff, rear deltoids, etc). Both the dumbbell upright row and face pull involve resisted external rotation, which means they can help balance out a traditional training routine (more on this to come).
Note From TG: Speaking of Face Pulls I am reminded of THIS classic T-Nation.com article by Mike Robertson and Bill Hartman on the topic.
The lateral raise is a staple in most shoulder training routines, however if done incorrectly, can be very similar to the barbell upright row.
By internally rotating at the top of a lateral raise, as if pouring a pitcher of water, the shoulder gets placed into resisted internal rotation with elevation, which we now know is not that great of a position.
Why is that a common cue (even Arnold recommends it!)? Because in order to maximally target the middle deltoid, it needs to be directly in line with the force of gravity and the “pouring-the-pitcher” position accomplishes this.
Middle deltoid is directly in line with the force of gravity (good!), however the shoulder is in internal rotation and elevation (bad!)
Anterior deltoid is directly in line with the force of gravity
Bending forward or lying face down in a bench targets the posterior deltoid because it is directly in line with the force of gravity.
Posterior deltoid is directly in line with the force of gravity
So how do we reduce our risk of injury while still maximizing the force through the middle deltoid?
Simple.
Hinge at our hips and lean forward, just a bit.
The line of gravity has now changed. We’re now able to externally rotate (reversing the pitcher pouring motion) while still placing the middle deltoid in perfect alignment with gravity.
Middle deltoid is directly in line with the force of gravity (good!) AND the shoulder is in external rotation (good!)
For a video demonstration and explanation of this, go HERE.
3) Don’t Overdo It…Pay Attention to Volume
When looking at weekly shoulder volume, don’t forget to account for all of the exercises that involve the shoulders as secondary movers.
Shoulder presses, lateral raises, and reverse flyes are not the only exercises that add to weekly shoulder volume.
The shoulders get worked during exercises like bench presses, rows, dips, and even pull-ups and pull-downs. If you have a volume goal you are trying to hit, be sure to keep this in mind to avoid overtraining and overuse injuries. Remember, more is not better…better is better.
4) Don’t Try To Get Too Creative Just For The Sake Of Novelty
Bruce Lee said,
“I fear not the man who practiced 10,000 kicks once, but I fear the man who has practiced one kick 10,000 times.”
Too much variety for the sake of novelty can limit your ability to progress, especially when it comes to shoulder training.
In general, the basic variations of shoulder movements are presses, lateral raises, extension-based movements (face pulls, reverse flyes, etc.), and global stability movements (farmer carries, planks, bird dogs, etc.).
My suggestion would be to find your preferred variations of those movements and perfect, fine tune, overload, and progress them. Yes, change it up every once in a while, but don’t swap out a solid landmine press for a banded, blood flow restricted, single-arm kettlebell press while standing on a BOSU over a pool of sharks with laser beams attached to their heads.
Stay tuned for Part II tomorrow where I offer four more of my top shoulder training tips.
About the Author
Nicholas M. Licameli
Doctor of Physical Therapy / Pro Natural Bodybuilder
Every single thing he does, Nick believes in giving himself to others in an attempt to make the world a happier, healthier, and more loving place. He wants to give people the power to change their lives. Bodybuilding and physical therapy serve as ways to carry out that cause. Nick graduated summa cum laude from Ramapo College of New Jersey with his bachelor’s degree in biology, furthered his education by completing his doctoral degree in physical therapy from Rutgers School of Biomedical and Health Sciences (previously the University of Medicine and Dentistry of New Jersey) at the age of 24, and has earned professional status in natural bodybuilding. His knowledge of sport and exercise biomechanics, movement quality, and the practical application of research combined with personal experience in bodybuilding and nutrition allows him to help people in truly unique ways. Love. Passion. Respect. Humility. Never an expert. Always a student. Love your journey.
Squat technique is a daunting topic to write about. No matter what, despite logic, sound reasoning and the fact not everyone falls neatly into any one way of doing anything (especially as it relates to lifting weights), some people are going to get triggered and go batshit crazy.
This post may rub some people (and coaches) the wrong way, but I beg you to take a deep breath, listen to what I have to say, and understand that this is not an attack against you or your way of doing things.
Rather, what follows is a brief look into what works for me and what I feel works best for the bulk of people I work with on a weekly basis as it relates to coaching the squat.
In short: Making the squat look more like a squat.
Gone, I feel, are the days where we’re overzealous with cueing people to aggressively sit back during their squats.
For competitive powerlifters, who are into powerlifting, and who are wearing squat suits, while they powerlift…the cue to sit back makes a lot of sense.
For everyone else?
Mmm, not so much.
Call me crazy (and some may do just that), but I’d garner a guess that many trainees would benefit from two subtle tweaks to their squat:
No more (or less emphasis on) sitting back.
Finding and maintaining foot pressure.
The former is not to say I don’t advocate to sit back. I do. It’s just I feel there should be a simultaneous break with knees going forward AND hips going back on the descent. The net result is a SQUAT down.
The latter takes a bit more practice, but has a profound effect on one’s ability to have a bit more “umph” out of the hole (quads, baby!) and to stay in a better position throughout the rep/set (I.e., less falling or dipping forward).
Check out the brief video below. Hopefully it’ll make sense and not cause anyone to punch a wall with their face.
The better title of this post should be: “10 Steps To Ensure You Won’t Destroy the Back Of Your Pants (With Your Spine) When You Deadlift.”
The deadlift, as with any compound movement, requires precision and attention to detail in order to 1) Perform it well 2) Not get hurt and 3) To have any shot at lifting appreciable weight. There are many moving parts to the lift, however, to speak candidly, of the “Big 3,” the case could be made it’s the least technical.13
This is not to insinuate it’s altogether easy or simple. Simple in concept? Yes. I mean, picking a barbell up off the ground and locking it out isn’t rocket science. Simple in execution? Well, that’s where things get a bit more complicated.
Below are some overarching (<—Ha, pun intended) “themes” with regards to setup and execution of the deadlift I feel are important across the board.
The internet likes to argue. It’ll argue whether or not the dress was gold or blue (remember that stupid debacle from a few years ago?), DC vs. Marvel, high-bar vs. low bar squats, and/or who’s the most bad-ass He-Man character not named He-Man.
Cyclone anyone?
More cogent to the topic at hand, people will also argue on the internet that anyone who SUMO deadlifts is cheating.
The prevailing, uppity, train of thought is that, because one is closer to the ground when performing a SUMO deadlift (compared to a conventional stance) it’s easier and thus it’s cheating…and somehow less relevant of a lift.
To which I say: bull to the shit.
Unless your name is Professor Dumbledore and can somehow make someone’s femur change length when they switch from a conventional stance to SUMO stance…the whole “it’s less ROM, it’s easier” argument is a moot one.
The moment arm (femur) doesn’t miraculously change from conventional to SUMO stance.
It’s just…..different.
What you lose in the sagittal plane during conventional, you gain in frontal plane when performing SUMO style deadlifts.
Generally speaking (due to the moment arms and levers at play):
Conventional Pulls: easier/faster off the ground, harder at lockout.
SUMO Pulls: harder/slower off the ground, all out sexification at lockout.
Stephanie Cohen hit a 525 lbs deadlift at a bodyweight of 123 lbs recently. It was done SUMO.
True to form, (some of) the internet projectile vomited all over itself calling her out, saying it didn’t count, and that it’s not real powerlifting (I guess because she was using straps?).
1. Hahahahaha. I have to assume most commenters calling her out couldn’t sniff her warm-up weight.
2. Um, the lift didn’t take place at a powerlifting meet. So thanks for making the stupidest argument you could possibly make.
[For the record: most powerlifters I know are some of the most respectful, courteous, and supportive people I know. They would never turn their nose to such an impressive lift.]
Step one to successful deadlift technique is to figure out what style feels best FOR YOU.
What feels better? What feels more powerful and stable? Which one places you in the best position possible?
Some people will do well with conventional style, while others may prefer SUMO. Both are fine.
Relax internet.
2) Get Your Air, Set Your Ribcage
Gone are the days of cuing people to excessively arch their backs. Gross, repetitive extension can have just as many negative ramifications on spine health as gross, repetitive flexion.
Ideally we want to shoot for more of a canister (or pillar) position where the pelvis and ribcage are “stacked” on top of one another. Most specifically, the pelvic floor and diaphragm are stacked on top of each other.
I like to cue people to get a big gulp of air and aim for 3D expansion (breathing into their stomach, sides, and back) before bending over to grab the bar.
Admittedly it takes a bit of practice but makes a profound difference in how the lift feels.
3) Chest Up, Show Me Your Logo
This is a cue I stole from Eric Cressey and a staple at Cressey Sports Performance. Generally speaking I like to see the following on the deadlift setup:
Shoulders above chest
Chest above hips
Hips above knees.
This isn’t the case for everyone, mind you, but a good rule of thumb to follow. This will ensure most people stay in a “neutral” position and offset the bulk of shear forces on the spine.
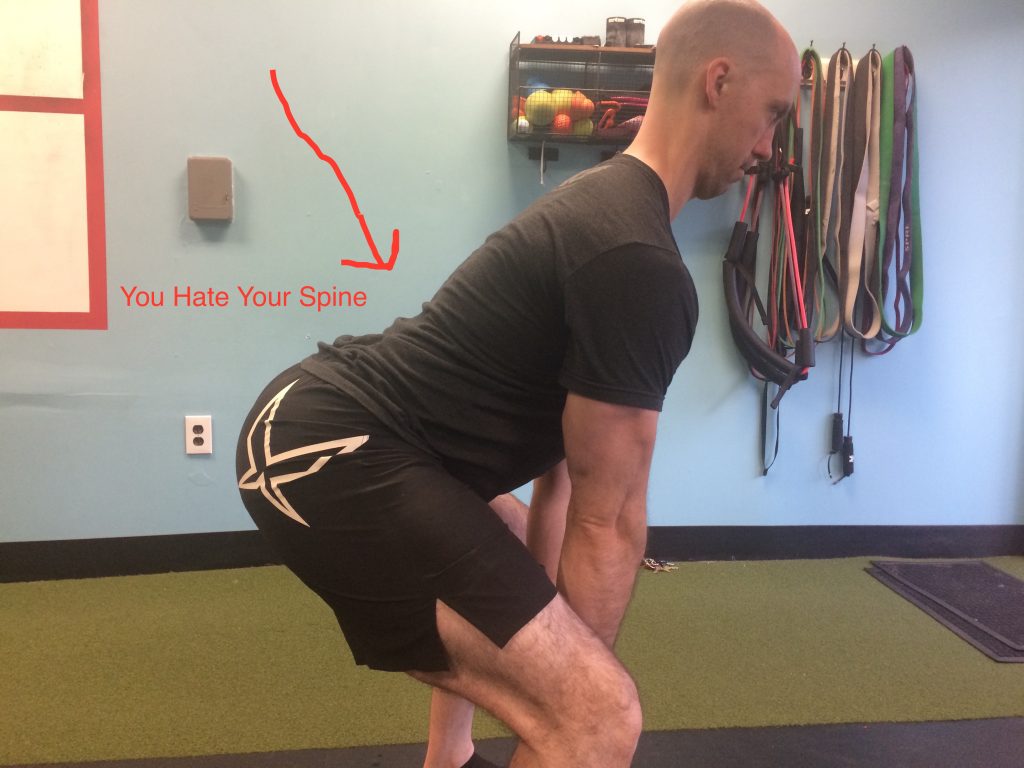
I’ll often stand in front of an individual and just say “show me your logo the entire time” as he or she descends down to the bar.
The end result should look like the picture above.
If not, this happens:
4) Armpits Over Barbell, Max Hamstring Tension
Regardless of style of pull, the goal with one’s set up should be armpits over the bar with maximal hamstring tension.
This will help ensure 1) hips are as close to the bar as possible (without making it too squatting. In that case the hips are actually further away….laterally) and 2) people will be less likely to pull via the lower back.
5) Turn Lats On
The lats are a big player with regards to deadlift technique. You want to make sure they’re “set” to help with upper back stiffness during the lift itself.
The best cue I’ve used to help with this is to tell someone to “squeeze the oranges in your armpits.”
Works like charm.
6) Pull Slack Out of the Bar or Bend the Bar
7) Push Away
The deadlift is just as much of a PUSHING exercise as it is pulling. You want to generate force into the ground and drive AWAY, thrusting your hips forward as you stand up.
People who solely focus on pulling the weight up – via their back – are often the ones that complain about it low back pain the most.
8) Finish at Top or Stand Tall
A common mistake I see some trainees make is either not getting their hip through at the top (AKA: the sexy stripper butt) or going too far.
“Hump the bar” at the top. Finish. Stand tall. All are cues I’ve used that work and get people to finish with their glutes.
9) Don’t Let Go
On the descent, don’t let go.
Stay engaged.
It’s here where I’ll often see people round their shoulders or lose their upper back position. And it makes me sad.
Keep your abdominals engaged (and keep squeezing that orange), even on the way down.
NOTE: Disregard for max effort pulls….;o)
10) Reset or Peel the Shoulders
There’s a time and place for tap-n-go deadlifts, but I have to admit I rarely use them. Instead I’ll tell people to “reset” between each rep – albeit it’s brief – to gulp their air, “peel their shoulders back,” and to make sure they’re in a good position for the next rep.
The video below is of me demonstrating this with a dumbbell, but you should still get the gist:
These Aren’t Set in Stone
None of what I said above is concrete.14 There will always be some slight deviations based off someone’s anatomy, ability level, and goal(s).
However, I have found that for most people, most of the time, they all work really well to get people’s technique in check.



 Noah is a Physical Therapist and Strength Coach based out of Portland, Maine.



 Tim is an exercise science graduate and CSCS who has been training in Baltimore MD for over 14 years. While his specialty is body composition, he has extensive experience working with clients from young athletes to cardiac rehabilitation patients. Tim has been published in a variety of fitness publications and writes for his blog when he isn’t helping clients in person.


 Nicholas M. Licameli
%2C445%2C286%2C400%2C400%2Carial%2C12%2C4%2C0%2C0%2C5_SCLZZZZZZZ_.jpg)