CategoriesExercise Technique Strength Training

Make the Back Squat Feel and Look Better

I’m currently in the throes of jet-lag sucktitude.

I’ll be back on my writing content horse next week, but I’ve got a treat for you today. TG.com regular contributor, Dr. Nicholas Licameli, is subbing in for me today and he went to TOWN in today’s guest post.

This is one of the most thorough articles I’ve read in a while on the topic with a metric shit ton1 of information with many additional links to help you nerd out a bit more if you so choose.

Enjoy!
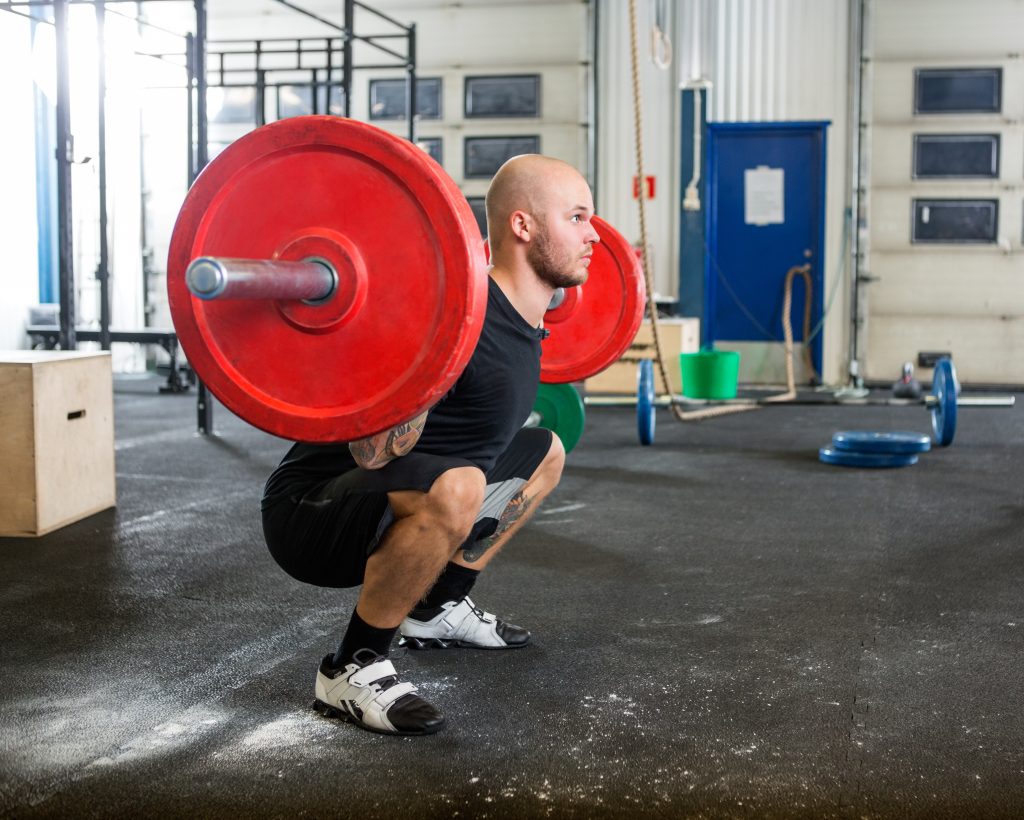
Copyright: leaf / 123RF Stock Photo

Make the Back Squat Feel & Look Better

The squat is a topic that has gotten a great deal of attention among many fitness and medical professionals since mankind first started lifting heavy things against gravity. Since then, much of the conversation has changed (with the advent of civilizations, roads, running water, Instagram.

However much has stayed the same.

I understand this isn’t the first article written about the squat.

Some of the greatest minds in fitness and strength and conditioning have written on the topic, and I encourage you to dive into the multitude of references that I’ve provided.

My goals for this article are to help make your squat look and feel better, improve performance and effectiveness, un-complicate the complicated, and give you the confidence to perform this foundational movement without fear.

Should You Squat?

The short answer is yes.

via GIPHY

Unfortunately, there are those that say to avoid squatting.

As a physical therapist, I have to apologize because much of that flawed thinking stems from misinformed and unqualified professionals in the medical field that are pleasantly ignorant to current practices.

The squat and hip hinge are foundational to basically all movements in and out of the gym. 

Whether you’re hitting a PR on the platform or sitting down on the toilet, you are squatting and you better be using proper technique. I’ve treated injuries as a result of poor squatting in both of those previously mentioned instances. Why avoid the squat in the gym if we’re going to do it constantly throughout our day anyway?

I say train it rather than avoid it.

Why not be prepared and do it right?

The squat and hip hinge require total control of the deep abdominals as well as the hips, pelvis, and entire spinal column. We can all agree that teaching proper abdominal bracing, pelvic positioning, and proper lifting mechanics are of utmost importance for the treatment of musculoskeletal injuries including knee, hip, and low back pain. For some reason however, we don’t all agree that squatting is necessary.

Newsflash…when done correctly, THEY’RE THE SAME THING!
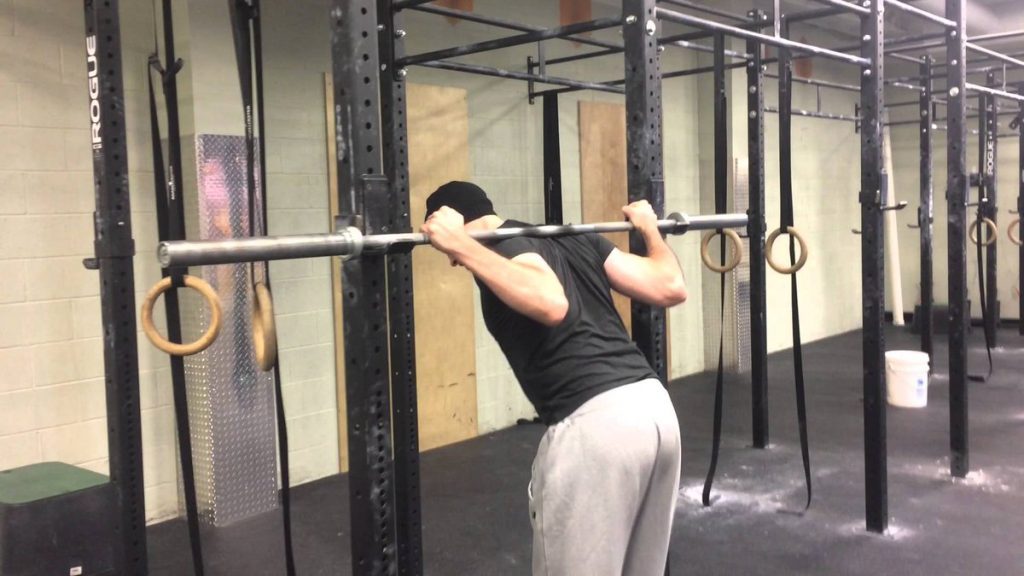
As both a doctor of physical therapy and professional natural bodybuilder, it should come as no surprise that in my opinion, people of all ages and from all walks of life should be squatting. This includes the young athlete just starting his/her training career, those recovering from injury, those trying to prevent injury, and even (and especially) the elderly.

No matter if you are an athlete or a great grandparent, we are all essentially “squatting” multiple times throughout our day, so why not train it, strengthen it, and perfect it?

You can release this muscle or stretch that muscle but if patients and clients don’t know how to squat and hip hinge, we are spinning our wheels and wasting valuable time.

How to Squat

While this isn’t a step by step “how to squat” article, here is a quick and dirty rundown of some things to keep in mind.

There is a plethora of information out there about thoracic spines, knees, ankles, spinal positioning, foot placement, etc., and sometimes it can complicate things, make people fearful, and mystify the movement.

Basically, a proper squat and hip hinge starts (obviously) at the hips with the spine in a neutral position (more on this later). After a breath in, tension should be kept throughout the body and throughout the movement. The entire spine, including the neck, mid back, and lower back, should be kept in a relatively stable and neutral position. The feet should remain actively planted on the floor with the weight evenly distributed.

More on all of this to come.


In the beginning of my lifting career, I struggled with finding the “groove” of the squat. This is partially due to improper mental cueing during the movement. Some of my mental cues during the squat were:

“Arch the back hard to avoid spinal flexion.”

“Keep the head and chest up so they remain in line with the horizon.”

“Sit back and push through the heels.”

“Always squat below parallel.”

While there could be worse things, especially considering that, like most beginners, my sources of information were muscle magazines and of course the biggest guy(s) at the gym, I think these cues can be quite misleading and detrimental to squat technique.

Here’s why.

“Arch the Back Hard to Avoid Spinal Flexion.”

Avoid a hard arch in the lower back.

Don’t let the lower back round of course, but rather maintain the natural arch of the lumbar spine.

Hard lumbar extension will crunch down on the delicate structures of the spine, put the glutes in a less than optimal position to stabilize the pelvis, and place the hip in slight flexion before the movement even starts.

Starting in hip flexion will cause the femur to run out of room in the acetabulum for hip flexion when you want it most…at the bottom range of the squat. This could result in femoral acetabular impingement (FAI) and labrum pathology.


Get out of that hard arch and find your neutral.

“Keep the Head and Chest Up So They Remain in Line With the Horizon.”

Keeping the head and chest up isn’t necessarily a bad thing, however if we achieve that position by hyperextending our backs and flaring our ribs forward, it becomes problematic and essentially unstable.

Cueing a slight posterior pelvic tilt prior to un-racking the weight and maintaining that position throughout should do the trick. This will place the spine and ribcage in more of a neutral position.

We maintain the position by taking a breath, contracting the upper back, lats, mid section (as if putting on a tight belt or walking into cold water up to your navel), pelvic floor (as if holding in gas or urine), and even the feet (more on this to come).

Check out my explanation of what it means to “contract your core” right here. Tony does an awesome job of explaining this here, as does John Rusin here. Quinn Henoch and Ryan Brown also hit the point home here. Eric Cressey nails the upper body and lat set up here.

“Sit Back and Push Through the Heels.”

It’s true that we don’t want to push through our toes and allow our heels to rise off the floor, however it is also true that we don’t want to shift our weight so far backward that the toes lose contact with the floor and most of the force goes through our heels.

Yes, we want to descend slightly backward, but the focus should really be on descending down between our hips.

When we say we put an adversary on “his/her heels,” we are saying that we put them in a vulnerable position and on the defense, which will likely lead to a step backward. Why would we want to put ourselves on our own heels while squatting?

A better cue is to have an “active foot,” evenly maintaining 3 points of contact with the floor: base of big toe, base of little toe, and heel. Tony explains this really well here. This foot position will help stabilize the hips and knees, as well.

Mastering the “active foot” takes practice, but once you feel it, there’s no going back.


For everything you (and your children and their children’s children) will ever need to know about squatting, check out this bad boy by Greg Nuckols.

Find Your Squat

Hey fellow millennials!

Remember what our mothers taught us…we are all special, we are all unique, everyone is a winner, Mufasa died of natural causes, and most importantly, we are all different!

When it comes to the squat, this last point is key.

We are all structured differently, which is why there is no particular squat that is perfect for everyone. Things like foot position, stance width, and squat depth will all be impacted by things like the size of our torsos, length of our femurs, and the structure of our hips and pelvis. We need to find the squat variation that best “speaks” to us.

The classic example of this is hip flexion range of motion and lumbar compensatory spinal flexion.

Much has been written about this topic, and to avoid making this more like a Harry Potter book rather than a guest post, I’m going to refer you to some excellent articles down below.

Keep in mind that a range of motion measurement taken while lying on a treatment table DOES NOT always necessarily correlate to what we observe during an actual movement pattern like a squat and vice versa.

That being said, a 2008 study (stolen by me from a fantastic article by Bret Contreras) showed a 60 degree difference in hip flexion range of motion between the least flexible (80 degrees) and most flexible (140 degrees) subjects out of a total of 200 hips.
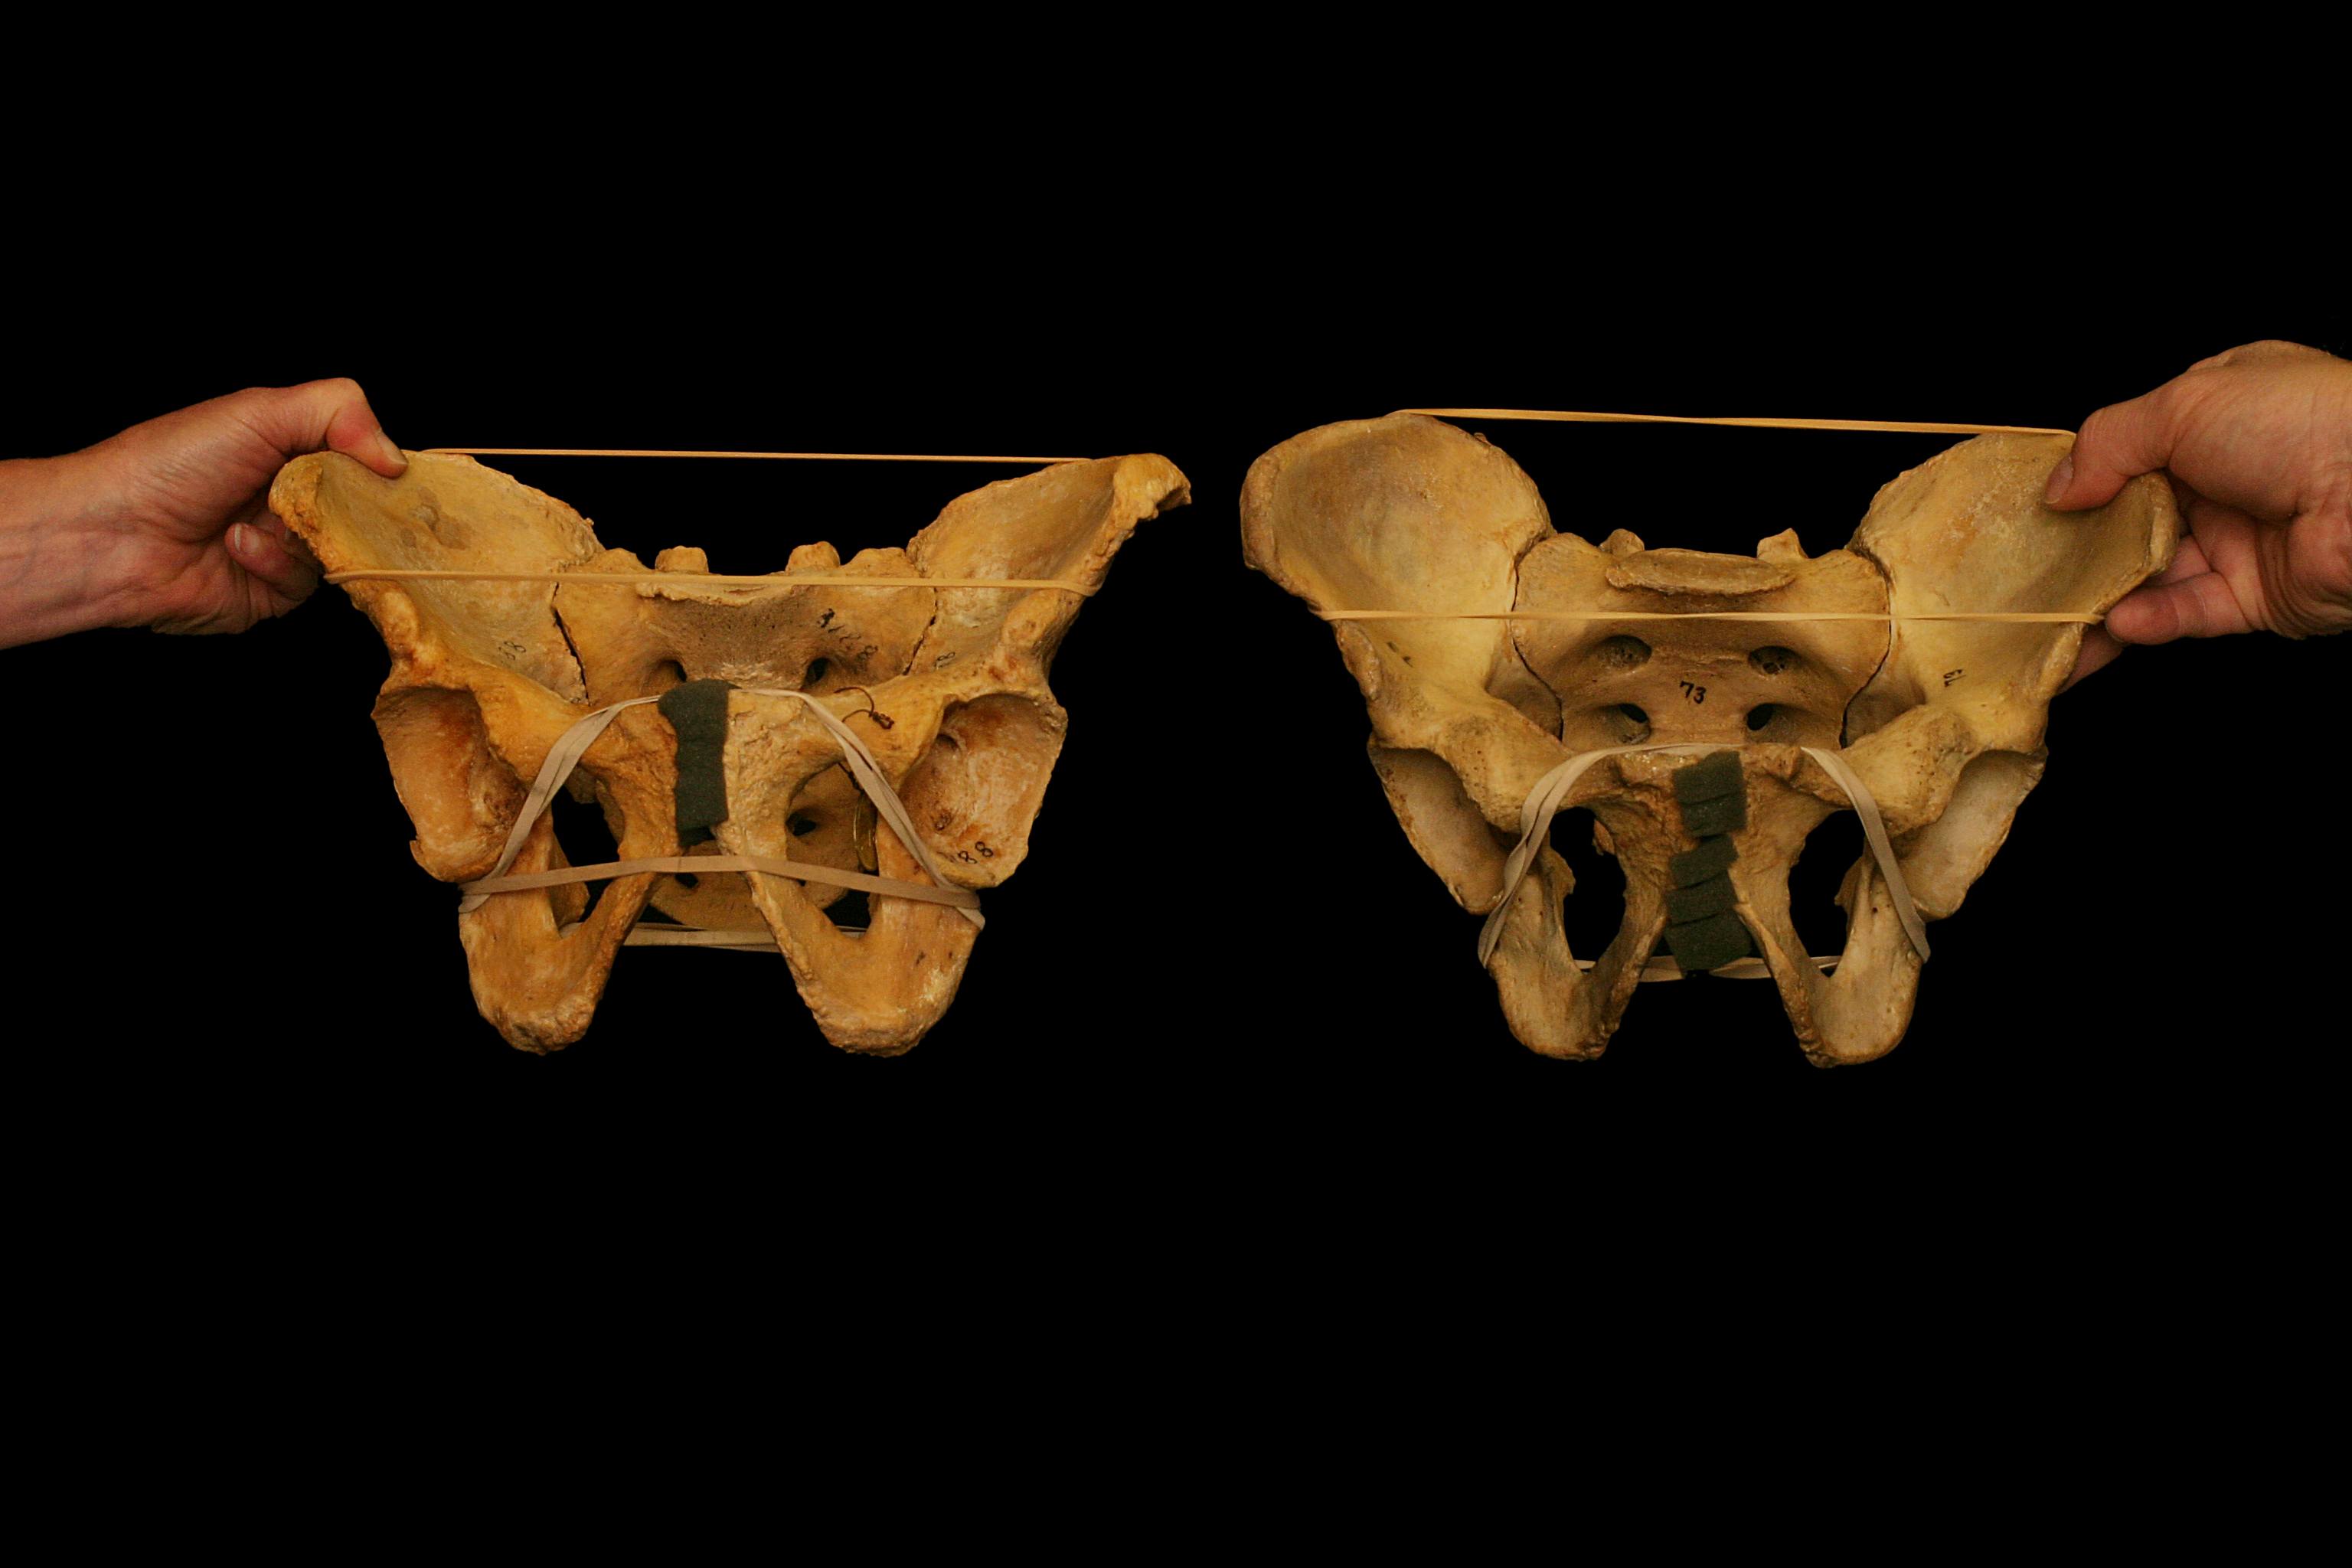
That’s quite a large difference, considering exercises like a deep squat require about 120 degrees of hip flexion. Differences in femoral anteversion/retroversion (how much the head of the femur faces forward or backward), acetabular anteversion/retroversion (how much the the hip socket faces forward or backward), and inclination angle of the femoral neck (angle of the neck and shaft) are seen from individual to individual as well as from hip to hip within the same person.

These genetic structural differences all change an individual’s ability to squat.

Thanks Mom and Dad…

Pushing past end range hip flexion in the descent of a squat for the sake of going deep will cause compensations up and down the chain, particularly flexion of the lumbar spine, AKA the dreaded “butt wink” (cue the tire screech and screams).

While some amount of lumbar flexion and “butt wink” is acceptable (we’ll get to that in a minute), too much, too often, in an uncontrolled manner, can be problematic.

So you can see why being married to a certain squat variation can be inappropriate.

If you are an individual that is unable to squat deeply but force yourself to perform deep barbell squats because your lifting partner says so, you’re setting yourself up for injury and a faulty and uncomfortable squat.

When it comes to varying your squat type, be sure to know your goal.

  • Why are you squatting?
  • To improve overall strength?
  • Hypertrophy?
  • To get a stronger squat?
  • To impress a member of the opposite sex (spoiler alert, they don’t care)?
  • To be able to pick up your child without pain?

There are many variations of the squat.

The conventional barbell back squat is just one option and unless you are training for a powerlifting meet, where you will be required to perform the conventional barbell back squat, there is no reason to lock yourself into only one type of squat.

Why not try a goblet squat? Or a sumo squat? Or a front squat? Why not use dumbbells or kettlebells instead of a barbell? If structured correctly, any variation of the squat will improve strength and hypertrophy as well as train the hip hinge and proper bending/lifting mechanics.


What’s the take home? We are all structurally different and it is important to find the squat pattern that works best of us.

Here are some great resources that will help you find the squat pattern that works best for you and your anatomy:

Dean Somerset’s 3 part monster part 1, part 2, part 3, Ryan DeBell, Stuart McGill, Quinn Henoch, and of course, Tony.

Note From TG: Nicholas is kind to include me amongst such elite company (Note to Self: you owe Nick 1000 Predator handshakes), but mine is easily the least pithy of the bunch.

Neutral Spine…Does It Exist?

Yes and no.

Research has shown that lumbar flexion, particularly at the bottom of a squat (the previously mentioned butt wink), is quite natural in a squatting pattern, particularly at the point in the movement where the hips start to run out of space for further flexion.

I agree with Quinn Henoch that neutral spine is more of a range rather than a set position, so don’t lose sleep over a little spinal flexion.

How much excursion is too much?

You knew the answer before you asked it.

It depends!

That being said, you definitely want to avoid movement at the spine and pelvis as much as possible. A moving base causes leaked energy and therefore less stability and built up tension. This means less force produced, less strength, and less Instagram pictures with a bumper-plate loaded bar on your back.

Don’t Stop Squatting Because You Have Pain Or Feel Restricted

If you experience pain during a squat, SEE A QUALIFIED HEALTHCARE PRACTITIONER.

You want someone that will question the type of squat that hurts, ask when in the range of motion the pain occurs, analyze your squat pattern, ask about weekly volume and load, inquire about recovery and sleep, and do everything in his/her power to keep you squatting.

There are always ways to modify the squat in order to keep training this key movement pattern while training with an injury.

Sharp pain at the bottom of a squat?

Try using a more neutral spine with slight flexion using a goblet squat to free up some space in that acetabulum.

No good?

Try adding a band around the knees during a few warm up sets.

Still no good?

Add a box to squat to at a level just above where the pain is felt.


The point is, you deserve better than a rushed, “Stop squatting for 4 weeks, take these anti-inflammatories, and see me in a month.

Oh, and if that doesn’t work, try foam rolling, cupping, turmeric, an oxygen deprivation mask, and VooDoo floss bands in a bath of apple cider vinegar and creatine.”

Fixing the symptoms with things like medication and surgery without considering the cause is an all too common theme.

These things have their place, of course, however they must be used appropriately. For example, surgery to repair a labrum that was damaged after repetitive impingement due to faulty lumbo-pelvic mechanics would be like fixing ceiling tiles in your living room instead of fixing the leaky roof.

After the surgery, if the individual returns to squatting with the same mechanics that got him/her under the knife in the first place, what good has been accomplished? Doesn’t make sense to repair, install, and paint shiny new ceiling tiles without fixing the roof first. Check out a video I made on this a while back right here.

So What Can We Do To Improve How The Squat Looks And Feels?

This is a tough question, because, as you probably guessed, everyone is different and it depends.

I recommend seeking out a qualified healthcare practitioner that will assess, reassess, and give you the tools to improve your individual squat.

Gone are the days of performing long, drawn out warm ups in the name of injury prevention, mobility, and movement optimization. A warm up should increase your heart rate and mentally and physically prepare you for the specific movements of the day.

The warm up should be active, specific and purposeful, not a cookie cutter series of activities like flailing around on the dirty gym floor or jamming a lacrosse ball into your sciatic nerve in hopes to break up adhesions in your piriformis.

Things like static stretching and foam rolling are passive activities.

In contrast, light cardio, dynamic stretching, loaded eccentrics, and actually getting under the bar and grooving the squat movement with sub-max loads are all active.

Passive activities like foam rolling do have their place, but they should be used appropriately. The benefits of foam rolling are short-lived, so if you’re going to foam roll, I’ve found it best to do it in between warm up sets. Of course, the specific muscles you target will be individual to you, your body, and your squat. For more on this, check out my article and video as well as this fantastic episode of Mobility Myths by Quinn Henoch.

Don’t feel obligated to use cardio as the only way to increase heart rate.

A dynamic series/circuit of exercises, combined with specific mobility work using active techniques such as loaded eccentrics and reciprocal inhibition (here and here), followed by some squatting with bodyweight or just the bar, will increase your heart rate just fine, not to mention both physically and mentally prime your system.


You get more bang for your buck.

For more on a proper warm up, including explanations of how to put it all together, check out my current lower body warm up right here as well as a great hip mobility exercise not in included in my warm up video.

Also, Quinn Henoch (<— can you tell I have a little man-crush on him?) nails it in this episode of Mobility Myths about stretching.

And That’s That

I hope this helps in your journey to finding and perfecting your individual squat.

Remember, there is nothing to fear about the squat and there is no need to overcomplicate this foundational movement. Don’t forget to take advantage of all the resources provided in this article, as they are from some of the greatest minds this field has ever seen. Happy squatting!

Oh, and one more thing…knees drifting over toes is OK.

About the Author

Nicholas M. Licameli

Doctor of Physical Therapy / Pro Natural Bodybuilder

Youtube: https://www.youtube.com/channel/UCAWFe5BmaJ_WFAh2aqsOg8g

Instagram: https://www.instagram.com/nicklicameli/

Facebook: https://www.facebook.com/nicholas.michael.58

Every single thing he does, Nick believes in giving himself to others in an attempt to make the world a happier, healthier, and more loving place.

He wants to give people the power to change their lives. Bodybuilding and physical therapy serve as ways to carry out that cause. Nick graduated summa cum laude from Ramapo College of New Jersey with his bachelor’s degree in biology, furthered his education by completing his doctoral degree in physical therapy from Rutgers School of Biomedical and Health Sciences (previously the University of Medicine and Dentistry of New Jersey) at the age of 24, and has earned professional status in natural bodybuilding.

His knowledge of sport and exercise biomechanics, movement quality, and the practical application of research combined with personal experience in bodybuilding and nutrition allows him to help people in truly unique ways. Love. Passion. Respect. Humility.   Never an expert. Always a student. Love your journey.


CategoriesProgram Design Strength Training

5 Quick Tips to Increase Strength

There are no “hacks” to getting strong. I’m a firm believer you get out of it what you put in.

It’s hard, and it takes a lot of hard work; oftentimes over the course of several years.

That said, below are a few “quick” tips that can help expedite the process. Admittedly there’s nothing profound or elaborate included, but I felt it important to suggest things that are easily accessible to the bulk of people who read this site.

Hope they resonate and help.5 Quick Tips to Increase Strength

1. WARNING: Captain Obvious suggestion of the day: Creatine

It still dumbfounds me to think there are people out there who train on a consistent basis, yet are still not taking creatine (and yes, this includes you as well ladies). It’s the most researched supplement in human history and it’s efficacy has been proven time and time again.

*It’s safe

*It works

*It’s NOT steroids

Just take five grams of creatine monohydrate (no need to buy the expensive brands that are laced with rocket fuel) per day and that’s that.

ADDENDUM: This is a suggestion. Not mandatory. The first step to addressing lack of progress is to audit your program and nutrition. If those two factors aren’t getting the job done, no one supplement is going to be the panacea.

That said, you still need to go train like a savage. Taking creatine alone isn’t going to mount to much.

2. Deadlift Barefoot

Everyone who trains with me here in Boston is told to take their shoes off when (s)he deadlifts.

To quote a new client I started with the other night

“Why?”

BECAUSE I SAID SO. HOW DARE YOU QUESTION ME. KNEEL BEFORE ZOD!!

Just kidding.

Well for starters, by taking your shoes off you’re now 1-2 inches closer to the ground, which is 1-2 inches less distance the bar has to travel.

Secondly, and more germane to the point, by taking your shoes off you’re now able to push through your heels. As a result, you’ll recruit more of your glutes and hamstrings to help out.

It’s not uncommon for some people to see a significant increase in how much weight they can pull off the ground from a little more posterior chain recruitment.

Thirdly, people will automatically think you’re badass cause you’re training with no shoes on. Of course, this is contingent on whether or not your feet smell like you’ve been walking through a sewer all day.

In that case, it’s your call.

3. Glute Activation

If your glutes aren’t able to fire full throttle, the hamstrings and lower back have to do more work than they’re accustomed to doing.

So from that standpoint paying more attention to glute activation can have positive repercussions for those suffering through chronic low-back pain.

However, people often forget the badonkadonks are not only the body’s dominant hip extensor which play a key role in athletics and strength, but are also a fairly large muscle that’s aesthetically pleasing to look at (cue obligatory fitness Insta-celebrity pic here).

Don’t worry, I got you too ladies:

By “turning on” the glutes with some simple activation techniques beforehand, you will undoubtedly be able to handle more weight when you squat and/or deadlift.

To that end, while I don’t have any PubMed research articles to back this up, more weight=more strength=more people want to see you naked.

Here are some of my favorites:

Up 2, Down 1


I like this variation because it allows for more eccentric overload on the lowering leg. Obviously one will need to master the two-legged variation first, but this is a nice progression to consider.

Band Resisted 1-Legged Hip Thrust


This is an ingenious variation I stole from Dean Somerset. If you’re looking to progress you’re 1-Legged Hip Thrust and having a hard time figuring out a way to do so, give this a try.

Creepy McCreepypants Frog Pumps


Popularized by none other than Bret Contreras, Frog Pumps are another fantastic exercise that aid in getting the glutes nice and juicy.

Thing is, they’re awkward as fuck to perform in public.

So, there’s only one way, and one way only, to perform them….

…..by copying Bret and Dr. John Rusin’s lead and making direct, intense eye contact with someone and making things creepy AF.2.

Reps can range anywhere from 15 to infinity.

4. Stop Testing Strength and Build It

I’m not the first to say this.

Many other coaches stronger than I – Chad Wesley Smith, Greg Robins, Julia Ladewski, Pavel, to name a few – have reverberated this quote on repeat throughout the years.

Far too often trainees head to the gym week in and week out and “test” their lifts rather than actually build them.

Now, mind you, lifting heavy things (90% + of 1 rep-max) is a non-negotiable factor to getting strong. However, as I noted in THIS blog post sub-maximal training (I.e., predominately using loads in the 65-85% range) is much UNDER-valued component to strength training.

In other words: loads in those ranges help one to BUILD strength.

Moreover, utilizing more sub-maximal training – while having an obvious muscle building effect (bigger muscles often equate to more force output) – also allows trainees to hone their technique and to get into (and maintain) proper positions to exhibit their strength more effectively.

5. Use Novelty Sparingly

Unlike coaches Dan John or Mike Boyle, I don’t find myself to be a very quotable person.

However, I am proud of this one:

“Look, I’m not bashing exercise variety. Variety has a time and place. However, the greatest gap in most people’s training isn’t lack of novelty, but rather lack of mastery.”

Many trainees have what I like to call “Squirrel Syndrome” when it comes to working out.

They start doing an exercise (or in most cases start an exercise program) and before they’ve put down the dumbbell on their first set they’re distracted by a new “squirrel.”


In this case the squirrel is an entirely new exercise program or a bright, shiny, new exercise.

– “Jumping Jack BOSU Bicep Curls?”

– “Sweet Christmas, I need that in my life.”

Want to get stronger?

Stop hopping exercise to exercise or program to program. It’s almost impossible to see steady progress if you’re heavy-handed on the novelty.

I like Jim Wendler’s approach to programming for strength:

“The boring shit works.”

Observe anyone who’s strong or has a physique you admire and almost always they’re doing very vanilla things in the weight room.

Contrarily, watch most other asshats who cry afoul about hitting their genetic ceiling3(or something equally as lame):

Jumping Jack BOSU Bicep Curls.

CategoriesStrength Training Uncategorized

The Unspoken Tenets of Strength Training

Full Disclosure: The title of today’s post implies I’m going to be discussing strength training. Jokes on you….I’m actually going to share my top 10 Instagram pics of my cat.

KIDDING…the topic du jour is strength training.

I’m just not going too deep down the rabbit hole.

For that and if you really want to get into the nitty-gritty particulars of strength training and the mechanisms at play go check out Vladmir Zatsiorsky’s Science and Practice of Strength Training.

It’s a light read.4

There you can learn everything as it relates to the scientific facts, including but not limited to motor unit recruitment, rate coding, delated transmutation, and a multitude of other words and phrases that’ll undoubtedly get people strong and make you sound smart.

Admittedly, what follows isn’t all that scientific. However it is rooted in 15+ years of coaching experience working alongside thousands of athletes/clients. I believe these “tenets” work.

Besides, I have big biceps so I obviously know what I’m talking about.

Copyright: maximkostenko / 123RF Stock Photo

The Unspoken Tenets of Strength Training

When it comes to the topic of strength training the internet likes to argue about optimal sets, reps, loading, periodization, low vs. high bar position, exercises to use, in what order, and anything and everything that may fall between the lines.

Pantless preacher curls for the win?

And, to be honest, many people can make a case for why they do this (compound lifts only) and why do that (one AMRAP set per muscle group with machines) and it’s likely they’re seeing results and increases in strength.

Who am I to judge?

That being said here are some additional, dare I say what should be commonsense thoughts for your consideration.

1) Make It a Priority

You’re busy, I’m busy, everyone’s busy.

Those people who get stronger are those who show up.

They make training a priority, not Netflix.5

Nothing so succinctly gets this point across than a quote I came across from Greg Robins:

Every time someone asks me about a client, or friend, etc. who has made a lot of progress…”How did they get that strong?”…..”What did they do to get there?”…Consistency, is always the first thing out of my mouth. They were consistent.

I find far too many trainees become paralyzed by too much analysis; too much pontificating and too little action.

Shut up, show up.

Do that, consistentlyworry less about the particulars, and good things are bound to happen.

2) Boring Is What Works

I Tweeted this the other day and it seemed to resonate with people:

I’m a bit biased and old-school and feel the best strength programs have their base in compound, barbell exercises.

Or the “Big 3” in bro-speak.

  • Squat
  • Bench Press
  • Deadlift

We could also toss in barbell rows, chin-ups/pull-ups, RDLs, GoodMornings, overhead presses, etc.

However, prioritize the Big 3 and focus on doing more work over time with those and you won’t be weak.6

People rarely need variety, they need to not have a 185 lb deadlift.

3) Technique/Positions Matter

I recently hit my first 600 lb deadlift. A month away from my 41st birthday, thank you very much.


I had someone ask me what is the difference between someone trying to improve from 500-600 lbs compared to 400-500 (or even 200-300 lbs)?

Easy…technique.

When someone is strong enough to pull 3x+ bodyweight it’s a safe bet their technique is on point.

When someone reaches the echelon of 700, 800, 900+ lbs…their technique has to be meticulous and razor sharp. By that point, however, more often that not, technique is pretty much on auto-pilot.

It’s like second nature and just happens.

I think why some people have a hard time, especially intermediate lifters who do have experience (and are kinda-sorta strong, but are trapped in “I’ve had the same PR for three years and I can’t seem to get over the hump purgatory”), is that they’re in poor positions.

More specifically they’re in poor positions and are unable to express their true strength.

A lot of people can “muscle” up a 300 lb, maybe even a 400 lb deadlift. They may shit out every single one of their vertebrae, but hey…they lock it out.

500 lbs? Meh, rarely.

600+ lbs? Hells to the no.

I’m a huge fan of using sub-maximal work (65-85% of 1-rep max) and keeping people accountable with their technique. Building volume with sub-maximal work ensures good positions (I.e., canister/pillar position, stacked joints) and also ensures technique will be solid.

The more “good” reps I can nudge out of people, the more likely is is they’ll start blasting through PR plateaus soon enough.

4) Utilize EDM Sets

Pigging back on the point above, another tactic I like to use is the concept of EDM (Estimated Daily Max) sets.

This takes into account how someone feels on any given day.

Some days weights fly up.

Other days, not so much.

Nothing is worse than showing up at the gym, having an epic workout planned, only to feel like a bag of dicks and everything feels heavy.

Well, explosive diarrhea sucks. But feeling like a bag of dicks is not to far behind.

As much of a fan as I am of percentage based training, something I’ve been utilizing more and more (especially with my older lifters) are EDM sets.7

Here’s an example:

Lets use the bench press.

I’ll have someone ramp up to his or her’s 3 EDM (3-rep Estimated Daily Max).

This won’t be a true rep-max remember, but a weight that’s challenging that day for 3-reps.

Ramp up sets are as follows:

95×8

135×5

185×3

205×3

225×3

250×3 <— 3 RM for the day.

I’ll then have them take the same weight (250 lbs) for some additional singles (3-5×1) to get a little more volume in.

Alternatively you can have someone work up to a 5-EDM and follow that with 2-3 additional sets of triples.

In both scenarios you ensure all reps are fast and that technique will be spotless. What’s more, you’re less likely to run someone into the ground and they’re more likely to recover and bounce back faster.

They still get some heavy(ish) work done, but with quality staying paramount.

5) Go To Bed

Go the fuck to bed, people.

You’ll only get as strong as how well you allow yourself to recover.

CategoriesStrength Training

Stuff That Works But People Think Doesn’t But It Does: Submaximal Training Edition

The movie The Bourne Identity, based off the novel of the same name written by Robert Ludlum, was released in the summer of 2002 and starred one Matt Damon.

Up until that point Damon wasn’t a no-name actor. He was most recognized for his roles in Good Will Hunting, Rounders, The Rainmaker, and Ocean’s 11, to name a few.

I, like many others upon hearing the news Matt Damon was going to be playing Jason Bourne – an iconic, bonafide, badass – had this reaction:

“The fuck?”

Matt Damon?

Matt Damon the same guy who was in The Talented Mr. Ripley and All the Pretty Horses? That Matt Damon?

“Pfffft, no way it’ll work,” I thought. “A piece of french toast comes across as more badass than Matt Damon.”

Clearly I, and everyone else, didn’t know what the hell we were talking about.

15 years and four installments later (five if you count The Bourne Legacy) it’s hard to think of anyone else playing Bourne.

Damon was/is a legit boss.

https://www.youtube.com/watch?v=pJz7P1V3_M4


Needless to say it worked.

People didn’t think it would, but it did.

So what does this have to do with anything? Well, I notice the same parallel in the strength & conditioning world.

People think something won’t or doesn’t work, but it does.

Take for instance sub-maximal training.

Sub-Maximal Say What Now?

Loosely described, maximal (or max-effort) training is a load – usually a one, three, or five rep max – that can’t be completed for an additional rep.

For example if you squat 275 lbs for three reps, but attempted a fourth and know you’ll perform the world’s fastest face plant, that’s your 3-rep max.

I.e., you’re unable to complete an additional rep.

Alternatively, sub-maximal training is best described by strength coach Todd Bumgardner:

Submaximal effort training is simply work done with heavy loads that don’t require maximal effort. The weights exist in the range between seventy-five and ninety percent of one rep maximum and each set finishes with a few reps left in the tank.”

There’s been a shift in recent years of people always training to failure and always utilizing maximal loads, because, you know, #peoplearefuckingstupid.

While I can appreciate one’s desire to want to train hard and at maximal effort, for many, most of time, it’s a less than optimal approach to take (long-term).

For starters, maximal training beats up the body. Now, before some snooty internet warrior chimes in with something like “but Tony, isn’t that the point of lifting weights? To challenge the body and force it to adapt?” let me explain.

Yes, I’d agree with that comment. Most people could benefit from training a little more savagely. Often, when someone says he or she isn’t getting results there’s a convenient correlation to how “hard” they’re working in the gym.

I.e., they’re not.

However, if you’re someone who’s routinely training at “max-effort” and/or training to failure and missing reps all the time I’d garner a guess you’re routinely compromising your ability to recover.

Ergo, unless your name is Wolverine or you’re *cough, cough* taking supplements, sustained max-effort training isn’t a smart choice.

Utilizing loads in the 75-90% range tends to be spot-on for the bulk of trainees. It serves as an obvious option for adding volume, which is an important component to adding muscle.

Moreover, sub-maximal training, when implemented intelligently, won’t brutalize your joints and it’ll allow you to train more frequently.

It’s a win-win.

NOTE: All this is not to insinuate maximal-effort training should be avoided at all costs. Don’t be cray-cray. If that’s how you’re interpreting things please take your face and throw it against a wall.

Training with sub-maximal loads isn’t only great for adding mass, but it’s also a great way to get strong.

Think of it this way: If you make your 3 rep-max your 5-rep max, it’ll also likely result in your 1-rep max seeing a boost too.

Don’t believe me? Here’s a real-world example.

Two months ago I started working with a female client, a coach herself, who walked in on day one with a 300 lb (straight bar) deadlift.

She was already very strong.

She wanted to work with me to help “audit” her deadlift and to help prep for her first barbell competition – not a powerlifting meet.

Some Brief Context: she’s actually a co-owner of a gym here in Boston that specializes in kettlebell training and is StrongFirst certified herself. The name alludes me at the moment (sleep deprivation sucks), but she and a few of her colleagues/co-workers are competing in a StrongFirst “event” that includes some barbell lifts, with the deadlift as the main course.8

Like I said, she walked in on day one with an already impressive pull of 300 lbs. Nevertheless, I was up for the challenge and wanted to see how much progress we could make in two months.

For eight weeks, we never pulled anything heavier than 250 lbs. In fact, I had her perform all sets based off 90% of her 1-rep max.9

This allowed us to utilize a bit more volume (she deadlifted 2x per week: one “heavy” day and one “light” day), albeit under the premise technique was going be at a premium (honing in on attaining a lifter’s wedge) while also ensuring reps stayed snappy.

For deadlifting success (and for a spine that won’t hate you) this is mucho important. Top video = zero lifter’s wedge. You’ll notice when I initiate the pull my armpits are way in front of the bar and subsequently shear loading on spine is significantly higher. Bottom Video = what the lifter’s wedge should look like (a term popularized by @backfitpro). I use the barbell as a counterbalance to pull my chest up (upper back extends) in addition to getting my weight back and armpits above the bar. Likewise I push my feet into the ground to generate more stability and force. Resultantly my back is placed into a much more biomechanically sound position (less shear) and I’m pretty sure this guarantees I’ll be nominated for People Magazine’s Sexiest Man Alive. Pffffft, who needs pecs that can cut diamonds and an 8-figure bank account. Overrated if you ask me. NOTE: load used in both videos was 390 lbs. You should notice a much smoother & faster bar path with the latter video.

A post shared by Tony Gentilcore (@tonygentilcore) on

The Result?

This past Monday marked the “ten days out” point from her competition and I wanted to test the waters.

Jessica ended up hitting a pretty damn clean 330 lbs (with more in the tank). We’re hoping she’ll match that number (if not add another 15-20 lbs) when it’s go time.

Remember: she hadn’t touched anything heavier than 250 lbs for eight weeks.

I know some of you reading will clamor for the meat and potatoes of her programming. That’s NOT the point of this post.10

The point is that you don’t have to shit a spleen and hoist max effort loads every time you walk into the gym. More often than not you should focus on quality reps (but strain sometimes), end each session kinda-sorta refreshed, and wanting more.

Sub-maximal training is a thing.

And it works.

Categoriescoaching Exercise Technique Strength Training

Stuff I Used to Say, When I Was An Idiot: Squat Edition

I remember the first time I saw Eminem perform. I was at my apartment in between classes watching a little TRL on MTV. It was spring break, 1999. I was in my living room. Many of my friends were somewhere else, not in my living room, galavanting around on some beach in Cancun soaking up some rays and debauchery.

Customary during Spring Break week MTV was also in Cancun, and hoping to catch a glimpse of my friends – and Britney – I tuned in.

Hi, my name is, what? My name is, who? My name is, chka-chka Slim Shady.

Mouth agape with a spoon full of Fruity Pebbles I was like, “what in the what is this?”

Eminem something er other now? Trying to impregnate Spice Girls?

“Pfffft, whatever,” I thought. “He won’t last.”

Ten #1 albums, 45+ million records sold, and one not so sucky movie – 8 Mile – to his credit, I guess you could say I was an idiot.

Eminem didn’t do so shabby for himself.

And while I could sit here and reminisce over you11other past pop-culture snafus I made….

  • Chicks will always dig stone washed jeans.
  • Robert Downey Jr will never make it as Iron Man.
  • ABC’s What About Brian? (2006) will become the next Grey’s Anatomy or Lost. It’ll be a sure fire hit.12

…lets not bask too much in my ineptitude.

I mean, Adele?

She’s okay. I guess.

Speaking candidly, my “misses” can extend to the coaching side of the spectrum as well. I can think of a few things I used to think or say back in the day that, upon reflection, were pretty idiotic.

What are some examples you ask?

Good question.

1. Telling People to Arch…HARD.

Like many people interested in lifting heavy things I used to read – and still do – anything and everything by the likes of Dave Tate, Jim Wendler, and Louie Simmons.

All three are strong mofos and have, arguably, put out some of the best training advice on getting strong within the past few decades.

I mean, are you going to argue with this guy?

Or this guy?

Or him?

Uhhhh, no.

They’ve all contributed to the greater good of the industry and many of us owe our PRs to any number of articles or resources they’ve produced throughout the years.

That being said, I had to audit myself a few years ago when it came to coaching the squat. After being introduced to the concepts of PRI (Postural Restoration Institute) and listening to other strong dudes like Chad Wesley Smith speak on the topic, I wondered if cueing people to “arch, hard!,” and to” sit back” were the right things to be saying to the bulk of my athletes/clients when they were getting under the bar?

Copyright: Kurhan / 123RF Stock Photo

Very few were competitive powerlifters and even fewer were geared lifers. I.e., none wore squat suits when training (which require an aggressive arch and sitting back to reap the benefits).

To be clear: There are still many very strong dudes (and coaches) who advocate squatting with a hard arch, and that’s their prerogative. The thing to appreciate, however, is that what works and is ideal for a geared lifter won’t necessarily (read: rarely) ever translate well to a non-geared lifter.

If I were to balance the “I want to be brutally strong AND not shit my spine on this next set” teeter-totter, I’d opt for not arching (aggressively).

The ribs & diaphragm are pointing in one direction (up) and the hips & pelvic floor are pointing in another (down).

Put simply, this is all sorts of fuckeduppery not a stable position.

We’re placing a ton of shear load on the spine.

What’s more, this will invariably force the lifter to initiate the movement by sitting back (rather than down. You know, a squat). As a result, often, the chest will fall forward, and the cue we default to is “arch, arch, arch, chest up, chest up, chest up.

This only feeds instability.

A better, I believe, approach (again, for non-geared lifters) is to tone down the arch and adopt what’s been referred to as the “canister” position.

Giving credit where it’s due, the first person I ever heard use this phrase was Dr. Evan Osar. A simple analogy he used was to think of your pelvis as one ring and your rib cage as a bunch of other rings.

We want all those rings to be stacked.

This will nudge us into a more stable, joint-friendly environment

Now, a minor glitch in this way of thinking is that some people think this infers going into posterior pelvic tilt, where we flatten out the lumbar spine.

This is not what’s happening. As you can see in the picture above, my hips are still behind the bar (still very important) but there’s less of an aggressive arch. Telling people to posteriorly tilt their pelvis towards spine neutral is different than telling them to flatten out their spine.

From there it’s a matter of owning the canister position and to squat down rather than back.

2. Knees Forward Instead of Knees Out

The “push your knees out” cue is something I’ve slide-stepped away from within the past year.

To defend my position I’ll need to piggy back off my comment above – the squat, for most trainees, is more about “sitting down” than it is “sitting back.”

I want the squat to look like a squat.

This means there will be forward translation of the tibia over the toes (but not so far that the heels come off the ground) and that there is equal parts knees coming forward and hips going back.

The net result = down.

My good friend, smart-as-balls physical therapist, and owner of Resilient Performance Physical Therapy (in NYC), Dr. Doug Kechijian, stated it best in a Tweet recently:

That’s right: it’s okay, nay, better?, for the knees to travel forward.

Cueing someone to break with their knees almost always negates the need to remind them to push their knees out.

They’ll do it automatically:


I’m all for using less coaching to clean up someone’s technique. The last thing most of your clients need is you barking a plethora of cues at them: “chest up, knees out, eyes forward, chin tucked, what’s the square root of 47?”

Play around with knees breaking first and then sitting down. My suspicions are that things will feel cleaner, more powerful, and the squat will feel like a squat.

Huh, weird.

ADDENDUM: NONE of this is to say I’m right. These are nothing more than cues and approaches that have worked for me in recents months/years with my clients and athletes. You may think I’m batshit crazy, and that’s cool.

I mean, to reiterate, I’ve been wrong on many things prior.

Amazon.com? Such a stupid idea.

I hope you’ll consider these suggestions however, and play around with them yourself. I think you’ll be surprised.

Categoriesmuscle growth Strength Training

It’s Not Just About the Weight…

In today’s guest post, regular contributor and resident Texan badass, Shane McLean, explains why the way to get bigger, faster, stronger isn’t to only put more weight on the bar.

Don’t get me wrong, it helps (and would be a nice starting point for some people)….but it’s not the only way.

Shane shares some examples below. Enjoy.

Copyright: jtrillol / 123RF Stock Photo


It’s Not Just About the Weight…

Progress in the weight room is much like life. It’s never in a straight line.

When you first started out on this lifting journey, progress (mostly likely) came easily and slapping more plates on the bar was second nature. You’d also look in the mirror, strike a pose and realize you’d gotten a little sexier.

Ah yes, those were the days.

As you move further along in this journey, the newbie gains start to wear off and it becomes more of a struggle to get bigger, faster and stronger.

When this started happening to me, I thought I was doing something wrong. I would workout harder and longer and would hop from program to program hoping to regain the gains.

But all I got was….

After some trial and error and having the benefit of some world class coaching, (hint hint Tony) I realized that changing a few variables was just the kick start I needed.

The following techniques have been around longer than you and me (and I’ve been around for a while) because they work. It’s not as sexy as twisting yourself into a pretzel or squatting on a Bosu ball, but your gains will thank you.

I’m bringing flexing back. The Bodybuilders don’t know how act.

1) Cluster Sets

I first came across cluster sets in Eric Cressey’s Maximum Strength program. After doing these for the first time, I felt like JJ Watt had taken me out. Ouch was an understatement.

Cluster sets involve inserting a short 10-second rest within a straight set which enables you to lift more weight without having to reduce volume. With a typical straight set, you lift the weight for a certain amount of reps and then put it down.

But with cluster sets, you’ll work with your 5 RM, lift it twice, rest for 10 seconds and complete 3 more 2 rep mini sets with 10 seconds of rest between each. You’ll do 4-5 total sets like this, which adds up to 40 reps with a 5RM weight.

Cluster sets work best with compound movements that don’t require a lot of set up time. For instance, barbell bench press variations, chin ups, barbell row variations or the Humble Goblet Squat.

For example:

1A. Flat barbell bench press (4 x 2) mini sets with 10 seconds of rest between – 5 sets

1B. Weighted chin up (4 x 2) mini sets with 10 seconds of rest between – 5 sets

A Little Sumthin on Bench Press Set-Up


And, I Little Sumthin on Chin-Ups


2) Pauses

Unless you’ve had your head in the sand for the past few years you should know the three main triggers for muscle hypertrophy are mechanical tension, metabolic stress and muscle damage.

If you want to geek out and get more in depth with this topic, click here.

Adding a pause in your lifts covers these bases, if somewhat brutally. But lifting weights isn’t meant to tickle and pausing while the working muscle is under tension will test you in ways that you’ve never thought possible.

Which is another way of saying they suck. ?

Pauses work best with compound lifts like deadlifts, squats, presses and rows but can also used for isolation exercises (Bicep curls, anyone?) to bring up a lagging muscle group.

Pauses can work on weaknesses, such as being slow off the floor when deadlifting or getting into a good squat position. Because if you’re struggling with certain positions within your lift, it helps to spend more time there, not less.


If you plan on using this technique, a 2- 3 second pause with a load between 60-80% 1 RM and lifting between 5- 10 reps works well. However, please feel free to experiment if you’re feeling particularly sadistic.


3) Every Minute on the Minute (EMOM) Sets for Strength

This method is synonymous with metabolic training and workout finishers at the end of a training.

Starting a set every minute on the minute holds you accountable for work you do in a certain period.

However, if you dare, they can be used for strength also because strength is a skill that needs to be practiced and this method allows you to spend some quality time under the bar not at the bar. ?

Load a barbell with 90% 1 RM for lifts such as squats, deadlifts, presses or pulls. Set the stopwatch for anywhere between 10 – 20 minutes and do one rep every minute on the minute.

This will help you hone your technique and get stronger and better conditioned.

However, this is neurologically demanding and should be done with only one lift per workout. This is best done periodically to shake things up and to bust through plateaus. Please enter at your own risk.

Wrapping Up

You don’t need to throw the baby out with the bathwater when your progress stalls. Just adding some small changes to the basics will have you flexing, smiling and loving the mirror again.

About the Author

Shane The Balance Guy” McLean, is an A.C.E Certified Personal Trainer working deep in the heart of Texas. Shane believes in balancing exercise with life while putting the fun back into both.

Categoriescoaching Exercise Technique personal training Program Design Strength Training

The Beginner’s Checklist for Deadlift Badassery

It’s the start of a new year and with it a proverbial reboot or rejuvenation towards one’s health and fitness. Well that, and a metric boat load13 of Facebook statuses of people complaining about all the “newbies” crowding the gym.

Copyright: langstrup / 123RF Stock Photo


I am not one to complain because 1) I don’t typically work out in a commercial gym 2) Nah nah nana naaaaah and 3) I think it’s a good thing when people decide to be more proactive, take an active role towards their health and well-being, and join a gym. I mean, really? Are you that inconvenienced? I can appreciate it’s slightly annoying when there’s a traffic jam at the power rack (made worse when people are using it to perform bicep curls) or that it’s more or less an obstacle course to walk around all the meandering patrons doing this thingamajiggy or that whateverthef***.

Relax. Deep breaths. It’ll all be over by the second week of February…;o)

Nevertheless, as pumped as I am that people take the initiative to begin an exercise regime, I’d be remiss not to cringe – just a little bit – at the overzealousness of some as they begin their fitness journey.

Last week was one of the rare weeks where I trained every day in a commercial gym (my wife was on vacation and I joined her at her gym) and while it was great to observe people getting after it, the coach in me couldn’t help but start to hyperventilate into a paper bag want to be a coach.

For example I saw a lot of people deadlifting. It was cool. I wanted to go over and high-five every single person. However, that would have been weird and possible justification for a restraining order I kept to myself, but past all of that was an insatiable desire to want to fix a lot of deadlifts.

I admired their intent, but I’d be lying if I said a small piece of my soul didn’t die watching a few people doing their thing.

You see, for a lot of beginners what I “think” ends up happening is that they watch a re-run of the CrossFit games on ESPN or watch videos like this:


…and are all like “that’s badass, I want to do that,” not recognizing that 1) a deadlift is much more than just bending over and lifting a barbell off the ground (regardless of whether it’s 1000+ lbs or 50 lbs) and 2) a straight bar deadlift (from the floor) is the most advanced variation of a deadlift there is. Not many people are ready or prepared enough on Day #1 to perform this safely and with proper technique.

So I figured I’d offer a sort of “check-list” for beginners to consider, and what I feel would be the appropriate progressions to follow to work up to a straight bar deadlift.

Note to Internet Hero Trainer Guy/Girl Who Will Inevitably Call Me Out On Why I Didn’t Address This Thing Or That: This is not a dissertation, it’s a blog post highlighting a few candid thoughts and processes. This is no where near an exhaustive breakdown of deadlift technique or programming.14

Checks and Balances

Everyone is different and there’s no ONE right way or variation or cue that applies across the board. People have different leverages, injury histories, and experience levels and it’s important to take all those things into heavy consideration when coaching anyone up on the deadlift.

I will say: I know what I DON’T want to see. This:

That’s pretty much THE golden rule.

Because it makes me do this:

There are any number of reasons someone’s deadlift may look like the above picture:

  • Lack of hip mobility to “access” the hip flexion required to get that low to floor.
  • Lack of t-spine mobility (specifically extension).
  • Lack of ankle dorsiflexion.
  • Lack of kinesthetic awareness.
  • The novelty of the exercise.
  • They were born on a Wednesday. I don’t know.

Obviously step #1 would be to address and musculoskeletal/mobility restrictions that may be present.

Lack of Hip Mobility

Wall Hip Flexor Mobilization


Dynamic Pigeon to Half Kneeling


Shin Box


Lack of T-Spine Mobility

Side Lying Windmill


T-Spine Extension (Done Right)


Lack of Ankle (and Big Toe) Dorsiflexion

This is a component that’s often overlooked. If someone can’t access dorsiflexion it’s going to compromise their ability to get into deep(er) hip flexion to get down to grab the barbell.

Active Ankle Dorsiflexion


Metatarsal Active Squat Drill


Lack of Kinesthetic Awareness

Oftentimes it’s lack of awareness of what the body/joints are doing in space that’s the limiting factor. I like to use the Cat-Camel drill to build context and to demonstrate what I don’t want to see (rounded back) and what I do want to see (neutral spine)


Addressing Novelty (<— This is HUGE)

Here we have the nuts and bolts. Much of time, even though the stuff discussed above is very important, it comes down to the novelty or “newness” of the exercise as to why some people fail. To be blunt, and as alluded to earlier, much of the reason why many fail at deadlifting from the get go (and end up hurt and using the lame excuse that deadlifts are dangerous for everyone) is because they’re too aggressive and end up gravitating towards variations (and loads) they’re not ready for.

They either don’t understand what it actually means to hinge through the hips (which is all a deadlift really is: it doesn’t always have to mean pulling a heavy barbell off the ground) and/or they fail to progress accordingly based off their experience and leverages.

Learning what it means to dissociate hip movement from lumbar movement step #1 in grooving a bonafide hip hinge. One of the most popular drills to do so is the Wall Hip Hinge. Unfortunately, as harmless and innocuous as it looks it’s easily butchered. Here’s how I like to coach it up:


Another drill I like is the Tall Kneeling Handcuff Hip Hinge. Here we can take some joints of the equation and place a KB behind the back, which, for some reason, works. I think Gandalf made it up.


If you’re’ interested in learning some more hip hinge drills you can check out in THIS article I wrote a few months ago.

Assuming I’m comfortable with someone’s hip hinge now it’s time to start adding some load.

Remember: You DO NOT have to use a straight bar, and I’d caution against it for more beginners. The only people who have to use a straight bar are competitive powerlifters and Olympic lifters. Generally the people who say otherwise are those who don’t coach people. So if some Joe Schmo internet warrior tells you otherwise tell him to f off.

While there are always exceptions to the rules my progression series is as follows:

1. Master Hip Hinge Drills.

2. Cable or Band Pull-Through.


3. Kettlebell Deadlift: Elevated if need be. And from there we can progress to pulling from the floor as well as ramping things up to 1-Arm KB Deadlift (which adds an additional rotary component), 2-KB Deadlift, and even Hover Deadlifts:


4. Trap Bar Deadlift: The trap bar (or hex bar) deadlift is an excellent choice for beginners or those with limited experience because of its user friendliness. This is often my “go to” variation for everyone I begin working with.

https://www.youtube.com/watch?v=p-sA3PG1kGY


  • For starters one’s center of gravity is inside the bar, which makes it easier to maintain an upright torso angle and a better neutral spinal position. All of which translates to less shear loading on the spine.
  • The elevated handles make it easier for those with mobility issues/restrictions – such as limited hip flexion and/or ankle dorsiflexion – to perform in a safe and successful manner.

5. Rack Pulls or Block Pulls: Here we can start adding anterior load. With the barbell now in front of the body the axis of rotation is further away which can result in more stress on the lower back. This is fine so long as neutral spine is maintained.

I’d note here that I much prefer Block Pulls. I find they have more carryover to the actual deadlift as you’re still able to get slack out of the bar (which you’re unable to do with a rack pull). Both are great options, though, when introducing straight bar variations.

Is your spine still attached? Can you still feel your legs? Good. Lets move on.

6. Sumo Deadlift/Conventional Deadlift: Look at you, son! Pulling from the floor now. Whatever variation allows for the most success, feels better, and guarantees proper spinal position is the one I’ll run with.

Sometimes people picked the wrong parents and their anatomy dictates what will be the best fit long-term. Generally speaking those with mobility restrictions, longer torsos, and short(er) arms will prefer sumo style over conventional. I prefer a middle-ground approach for many and often use a Modified Sumo Stance with my clients/athletes:

https://www.youtube.com/watch?v=q6Xjb72gGTE


None of this speaks to the other particulars I like to go over with trainees with regards to foot placement, hand placement, leg drive, common mistakes with lockout and the descent, not to mention appreciating, getting, and maintaining body tension. You can do a search on the site and find an abyss of other deadlift articles that go over all those things.

The goal today was to showcase my (general) approach to deadlifting with beginners. I hope it helped.

Addendum (Other Stuff I Wanted to Say)

1. Consider hiring a competent coach to show you the ropes. A good litmus test to figure out whether or not they know what they’re talking about:

  • Ask them if they know who Andy Bolton is.
  • Have him or her point to their posterior chain. If they point to their abs. Walk away.
  • They can differentiate between a deadlift and a squat.
  • They actually look like they lift weights.

2. Stop BOUNCING your repetitions. It’s a DEADlift, not a BOUNCElift. On each rep, when you return to the floor, you should come to a complete stop. “Reset” your air and spinal position, and repeat.

3. I HATE high-rep deadlifts, especially for beginners. Fatigue is going to compromise form. Try to stick to no more than 5-reps per set.

4. Home base – in terms of loading – should be in the 65-80% range of 1-rep max. Not that this means you should test your 1RM right away. The thing to consider is that you don’t NEED to train heavy to start. Beginners or un-trained individuals can train with as low as 40% of 1RM (Hint: that’s super light) and still reap all the benefits and gain a training effect. Honing technique should be the main goal at this point.

5. Anyone see La-La Land yet?

CategoriesAssessment coaching Corrective Exercise

Porcelain Post: Building a Wider Base to Reach a Higher Peak

NOTE: the term “Porcelain Post” was invented by Brian Patrick Murphy and Pete Dupuis. Without getting into the specifics, it describes a post that can be read in the same time it takes you to go #2.

Huh, I guess that was more specific than I thought.

Enjoy.

Building a Wider Base to Reach a Higher Peak

13460109 - himalaya mountains

Copyright: kapu / 123RF Stock Photo

I received a pretty cool email this morning from a college athlete of mine (Division I baseball) whom I worked with this past summer.

To give a little back story he had trained with me at Cressey Sports Performance a few years ago when he was in high-school, and had reached out to me this past May after completing his Junior season at school.

He walked into CORE and after going through the particulars – a thorough assessment, discussing his season, what he felt he needed to work on, his nagging back pain, his favorite GI Joe character, you know, the important stuff – he had this to say:

“The time I felt best was when you were writing my programs.”

With my chest sticking out a little further we broke things down and came up with a game plan for the summer, particularly with regards to how we were going to tackle his chronic back issue that had been hampering him for a few seasons:

  • As with any baseball player (and pretty much every athlete in the history of ever) we were going to hammer anterior core strength/stability to encourage more posterior pelvic tilt and implement drills to learn to dissociate hip movement from lumbar movement. Read: a metric SHIT-ton of deadbugs and birddogs. Not sexy, but whatever.
  • Work on regaining appropriate scapular upward rotation via actual scapular movement and not extending through lower back or shrugging.
  • Learn to control rib-position (limit rib flair and thus excessive extension) via positional breathing drills. There’s a lot of magic that happens when you teach someone the importance of a full exhale.
  • Also, teaching the importance of the reach and allowing the shoulder blades to move around the ribcage (again this whole extension thing rears its ugly head).


  • And, last but not least…still lift heavy things. Albeit doing my job as the coach to “pump the brakes” when needed and not fall into the trap of “lifting heavy at all costs because that’s what athletes do.” Truth be told: this mentality is probably why this athlete kept getting hurt in the first place.

To this last point (not lifting “heavy”), I wanted to showcase that it was more about the QUALITY of the movement and taking the time to 1) do stuff right and 2) understand how building a wider base (via more volume with SUB-MAXIMAL loads) will help with reaching a higher (strength) peak.15

Now, most guys at this point would roll their eyes and think I was going soft. However, this athlete was on board and willing to trust the process. So went to work for three months.

I received this email this morning:

“How’s it going? I wanted to tell you that yesterday we had our first testing day and I got 515 on a one rep max for trap bar deadlift! The best part is my back felt good after!”

He nailed a 515 lb deadlift despite having never gone above 405 all summer (on the last week we trained together).16

We still got after it all summer. He had his fair share of squatting (2 KB Front Squats), single leg work, carries, glute bridges, rows, Pallof presses, push-ups, and me making fun of him for having never watched The Usual Suspects. That’s sacrilege if you ask me.

However, the vast majority of his “strength” work was done in the 60-80% range and we were meticulous with making sure that every rep was pain free and that technique was solid.

I’d make the case that because we addressed alignment and stability issues along with movement quality, and got him into a better position, that he was then able to express his “true” strength more effectively when the time came.

The answer isn’t always to “lift heavy.”

Something to think about.

Categoriescoaching Corrective Exercise Exercise Technique Program Design Strength Training

How Unilateral Strength Training Can Improve Your Squat, Bench, and Deadlift

Another fantastic guest post today from Shane McLean. This time he tackles the importance of unilateral strength training and offers some neat ideas as to the best accessory movements to compliment the “big 3.”

Copyright: vadymvdrobot / 123RF Stock Photo


Don’t you love “that” guy who always stands between you and the dumbbells while doing single arm curls and making faces only his mother could love? What if I told you that he’s actually on to something, minus the faces and grunting?

Bilateral exercises (not biceps curls) should form the foundation of your strength program because this is where you’ll get most of your gains. However, unilateral training often gets neglected in the quest to get bigger and stronger because it’s just not as sexy (or cool) as a big squat, deadlift or overhead press.

However, unilateral training will help you get stronger, improve the big lifts (by shoring up weakness) and provide the following benefits.

Reduce Muscle Imbalances

Due to activities of daily living almost everybody has a dominant and non-dominant side. For instance, carrying more groceries on one side over the other over time may get one arm stronger.

During bilateral exercises such as a press or squat variation, your dominant side can pick up the slack for the weaker side.

Have you ever seen a lifter struggle to lock out one side over the other during a barbell bench press? I rest my case. Improving your “weaker” side will reduce your injury risk and help increase overall lifting numbers.

Improved Muscle Recruitment

Unilateral training makes you work harder and recruit more muscle fibers to perform the exact same movement, such as a split squat.

Taking one leg out of the equation forces your abductors and core to stabilize your pelvis while the working leg performs a split squat. Working more muscle with less weight will help correct strength imbalances between sides, also.

Core Work Without Crunches

When training unilaterally, you automatically throw your body off balance, forcing your core muscles to engage in order to keep yourself upright.

Trust me when I say that’s a good thing.

And we can double-down on the core training ante by utilizing offset loading:


Programming Guidelines

Unilateral exercises are best performed as an accessory movement after your big lift for the day.

Choose one or two single limb movements per session and perform three to four sets on both sides. The repetitions performed will depend on your goal.

For example:

  • Strength: 4 – 6 reps
  • Hypertrophy/Fat Loss: 8 – 15 reps

If you have a strength or muscle size imbalance always start with the weaker/smaller side first and let the weaker side determine the weight/reps you do on the stronger side.

Without further ado, here are my top two accessory exercises you should be doing to improve your squat, dead lift and press numbers. Sorry, this is a biceps curl free zone.

1) Deadlift

 Suitcase Carries


Not only will carries change your life in three weeks, according to Dan ‘the man’ John, they can strengthen grip imbalances between hands which can be a limiting factor when pulling heavy from the floor or opening the pickle jar.

When you’re doing carries (you do, right?), pair them with a movement that doesn’t demand a lot of grip strength, so you can get more out of it. For example:

1A. Goblet squat/press variation.

1B. Suitcase carry- (25-50% of your bodyweight) 30 steps one hand then 30 steps with the opposite hand.

Form considerations – cues “shoulders down and back” or “chest up” work well here. Checking your form in a mirror will help if you having trouble knowing if you’re overcompensating or not.

Front Racked Kettlebell Bulgarian Split Squat

These were first introduced to me by Anthony Dexmier to improve my pulling ability from the floor. Let’s just say after doing them, we weren’t the best of friends.

Hardcore dead lifters knows that hip mobility, upper back strength and leg drive are essential elements for pulling heavy, and this exercise covers all those bases, if somewhat brutally.


Pairing this exercise with a single arm row variation is a real upper back whammy that you’re sure to enjoy. For example

1A. Front racked kettle bell elevated split squat – 12 reps on each leg

1B. 3 point dumbbell row – 12 reps on each arm


Form considerations – Perform a bodyweight elevated split squat and notice where your big toe is, and then place weight plate in front of it. This will give you a reference point and shorten your set up time between sets. This is courtesy of the one and only Jordan Syatt.

Keep a nice tall chest and your wrists in neutral during this entire movement and smile through the pain.

2) Bench Press

Landmine Press

The single arm landmine press is a mix between a vertical and horizontal movement which makes this great for individuals who lack the shoulder mobility for overhead pressing and for those looking to improve their press numbers.

Note From TG (to Shane): How could you not include a link to THIS article I wrote discussing how to assess overhead mobility and drills to help improve it?

Why Shane…….WHY?!?!?

The beginning of this exercise (initial push of the shoulders) is the hardest part of the movement. This will assist you with pushing the bar off your chest during the bench press or pushing the barbell overhead from a dead stop. The extra core work doesn’t go astray either.

This press can be done from a variety of positions. For example, it can be done standing, tall kneeling and this half kneeling variation courtesy of Eric Cressey:


Pairing this landmine variation with a hip flexor stretch works well and provides an active rest between sides and sets. For example

1A. Half kneeling landmine press (right hand)

1B. Half kneeling hip flexor stretch (right knee down) – 30 seconds

1C. Half kneeling landmine press (left hand)

1D. Half kneeling hip flexor stretch (left knee down) – 30 seconds

Form considerations- Make sure the barbell is close to the front of your shoulder and actively squeeze the barbell. This provides Irradiation, allowing you to produce more force and lift more weight. This also turns on the rotator cuff, which helps with shoulder stability.

Single Arm Dumbbell Floor Press

The reduced range of motion of the floor press makes this a great triceps builder (when the elbows are close to your side) and will assist you in getting stronger with the lockout part of any press variation.

The single arm variation will turn on your core and shoulder stabilizers due to the offset load that can get neglected during bench/overhead pressing. It’s a shoulder saver because it eliminates the lower half of the press where the shoulder is externally rotated and nasty things like shoulder impingements can happen.


Pairing this with a side plank or a suitcase carry gives your shoulders and core the extra work they deserve. For example

1A. Floor press

1B. Side plank variation 30 sec/ Suitcase carry – (25-50% of your bodyweight) 30 steps one hand then 30 steps in the opposite hand.

Form considerations- Grip the dumbbell tight or strangle the handle and keep the elbow close to your side but not touching. Touch the entire upper arm to the ground at the start of each rep.

3) Squat

Single Leg Negative Calf Raise

It’s a common issue to lack ankle mobility as we wear shoes that inhibit the movement of the ankles, like wearing high heels, for example. The ability to dorsiflex the ankle (how far the knees can go over the toes without raising the heel) can get compromised and this can show up in the squat.

As the squat movement has to come from somewhere, lacking dorsiflexion can negatively affect the joints further up the kinetic chain especially the knee, and who hasn’t had sore knees (and everything else) at the end of an intense squat session?

If hammering away at ankle mobility isn’t working for you, try this single leg negative calf raise drill from Dr. Ryan DeBell before your squat session. This will help with ankle dorsiflexion under load.


Form considerations- Having something solid to hold on to is a must. If you have pain bending the knee during this drill, please use a pain free range of motion. Do 5-10 reps on each leg before you squat. Your knees will thank you.

Barbell Reverse Lunge- Front Squat Grip

Most lunge variations are interchangeable because they work on knee stability (knees that go out instead of in) and core (reduced base of support) hip mobility (active stretch of the hip flexors) and help build your quad strength and size. Sounds like everything a good squat needs, right?

This variation does this and more. The front squat grip works on your anterior core upper back strength and thoracic mobility which are also needed for a strong squat.


Pairing this with an upper back or anterior core exercise in a superset works well. For example

1A. Barbell Reverse Lunge – Front Squat Grip – 8-12 reps on both legs

1B. Chin up

Or

1A. Barbell reverse lunge- Front squat grip 8-12 reps on both legs

1B. RKC Front Plank

Form considerations- Start on the light side until you nail the technique and feel confident that you’re not going to bite the floor. Keep the ears away from the shoulders and maintain an upright torso during this exercise.

Wrapping Up

Don’t forget about unilateral training when it comes to getting bigger, stronger and more awesome. Including these exercises into your routine will improve your lifting numbers and overall balance and will help keep you off the lifting DL.

You can throw in some single arm curls (for the girls) to keep Ron happy, if you must. J

Author’s Bio

 Shane “The Balance Guy” McLean, is an A.C.E Certified Personal Trainer working deep in the heart of Dallas, Texas.

No, Shane doesn’t wear a cowboy hat or boots.  After being told that his posture blows by Eric Cressey, he has made it his mission to rid the world of desk jockeys and have fun while doing so.

After all exercise is fun and never a “work” out.

You can follow Shane on Twitter HERE, and Facebook HERE.

CategoriesAssessment coaching personal training Program Design Strength Training youth/sports training

Addressing the Stone Cold Facts of Training Athletes

Remember that show diary on MTV? You know, the one that aired back in the early to mid-2000s?

The documentary style show centered mostly on musicians and celebrities and followed them through their daily lives.

Each episode started with said celebrity looking into the camera and saying…..

“You think you know, but you have no idea.”

And then for the next 60 minutes we got a true taste of the celebrity lifestyle, given an opportunity to witness their trials and tribulations with the paparazzi, hectic travel schedules, demands on their time, and what it’s like to demand a bowl full of green only M&Ms in their dressing room (and actually get it), not to mention the inside scoop on what it’s really like to be able to bang anyone you want.

Stupid celebrities. They suck….;o)17

Sometimes I feel like strength coaches should have their own version of the show diary, because when it comes to training athletes I feel like many people out there “think they know….

“…..but they have no idea.”

Oh snap, see what I just did there?

While I don’t think it’s rocket science, I’d be lying if I said there isn’t a lot of attention to detail when it comes to training athletes – or any person for that matter – and getting them ready for a competitive season. Everyone is different, with different backgrounds, ability level, injury history, strengths, weaknesses, goals, anthropometry, as well as considerations with regards to the unique demands of each sport and position(s) played.

By contrast, there are numerous parallels in training despite athletic endeavors or whether or not someone is an athlete to begin with.

We can take the Dan John mantra of:

Push, pull, hinge, squat, lunge, carry

Do those things, do them well, and do them often….and you’ll be better off than most. It’s complicated in its simplicity.

Much like Dan I prefer to train everyone I work with as if they’re an athlete. There’s something magical that happens when I can get Joe from accounting or Dolores from HR to deadlift 2x bodyweight or to start tossing around some medicine balls. Even better if it’s done while listening to Wu-Tang Clan.

They wake up!

They’re less of a health/fitness zombie, haphazardly meandering and “bumping” into exercises. Once they start to train with intent and purpose – and move – it’s game time.

That said, lets be honest: when it does come to training athletes there are many other factors to consider; many more than an article like this can cover. However, I do want to discuss a few philosophical “stamps” that some coaches deem indelible or permanent when it comes to training athletes, when in fact they’re anything but.

1) Strong At All Costs

There’s a part of me that cringes to admit this, but it needs to be said: strength isn’t always the answer.

Don’t get me wrong, I still believe strength is the foundation for every other athletic quality we’d want to improve.

If you want to run faster (<— yes, this matters for endurance athletes too), jump higher, throw things harder or further, or make other people destroy the back of their pants, it’s never a bad thing to be stronger.

When working with athletes, though, there’s a spectrum. If you’re working with a college freshman who’s never followed a structured program and is trying to improve their performance to get more playing time, you can bet I’ll take a more aggressive approach with his or her’s training and place a premium on strength.

When working with a professional athlete – who’s already performing at a high level, and is worth millions of dollars – is it really going to make that much of a difference taking their deadlift from 450 lbs to 500 lbs?

Moreover, we’ve all seen those snazzy YouTube and Instagram videos of people jumping onto 60″ boxes:


It may get you some additional followers and IG “street cred”…but man, the risk-reward is pretty steep if you ask me. I’m not willing to risk my career (and that of my athletes) for some stupid gym trick.

Besides, if I wanted to I’d up the ante and have them do it while juggling three chainsaws. BOOM! Viral video.

To that end, I like Mike Robertson’s quote which sums my thoughts up the best:

“I think athletes need to be using the weight room as a tool to improve efficiency and athleticism, not simply push as much weight as possible – MR”

2) You Don’t Have to OLY Lift

Some coaches live and die by the OLY lifts, and I can’t blame them…..they work. But as with anything, they’re a tool and a means to an end. They’re not the end-all-be-all-panacea-of-athletic-and-world-domination.

I don’t feel any coach should receive demerit points – or be kicked out of Gryffindor – because he or she chooses not to implement them into their programming.

Lets be real: If you know you have an athlete for a few years, and have the time to hone technique and progress them accordingly, the OLY lifts are a good fit. It’s another thing, too, if you’re competent.

I for one am never guaranteed four years with an athlete, nor am I remotely close to feeling competent enough to teaching the OLY lifts. And that’s okay….

I can still have them perform other things that’ll get the job done:

Jumps:

https://www.youtube.com/watch?v=QUbClRjpLGk


https://www.youtube.com/watch?v=kn5v85ekXFs


NOTE: both videos above courtesy of Adam Feit.

Starts/Acceleration

5 yd Starts

https://www.youtube.com/watch?v=TklqD8uN_Ds


5 yd Jog to 10 yd Acceleration

https://www.youtube.com/watch?v=HM-BPJKTslg


Change of Direction

Up 2, Back 1 Drill

https://www.youtube.com/watch?v=YSFDp1QSA2w


That One Time I Looked Athletic

Medicine Balls Drills

Scoop Toss


OH Stomp


Kettlebell Swings


Punching Ramsay Bolton in the Mouth

No video available.18

3) Single Leg Work Matters

This is probably the part where some people roll their eyes or maybe scroll past, but hear me out.

I think it’s silly when I see coaches on Facebook argue over bilateral vs. unilateral movements and try to win everyone over as to which is best.

They’re both fantastic and warrant attention.

Where I find the most value in single leg training:

  • Serves as a nice way to reduce axial loading on the spine when necessary.
  • It can be argued all sports are performed – in one way or another – on one leg, so from a specificity standpoint it makes sense to include it.
  • Helps to address any woeful imbalance or weakness between one leg and the other.
  • Places a premium on hip stability and core/pelvic control.

All that said, I do find many people are too aggressive with their single leg training. It’s one thing to push the limits with your more traditional strength exercises like squats and deadlifts, but when I see athletes upping the ante on their single leg work to the point where knees start caving in and backs start rounding that’s when I lose it.

I’m all about quality movement with any exercise, but more so with single leg training. I’d rather err on the side of conservative and make sure the athlete is owning the movement and not letting their ego get in the way.

Like that one time I posted this video and Ben Bruno shot back a text showing me a video of Kate Upton using more weight than me. Thanks Ben! Jerk….;o)

Unfortunately, some coaches are so set in their ways that they’ll never cross the picket lines. They’re either team bilateral or team unilateral.

How about some middle ground with B-Stance variations?


4) Recognize Positions Matter

I’m not referring to Quarterback or Right Fielder here. But rather, joint positions and how that can play into performance in the weight room and on the field.

If you work with athletes you work with extension.

As I noted in THIS post, anterior pelvic tilt is normal. However, when it’s excessive it can have a few ramifications, particularly as it relates to this discussion.

Without going into too much of the particulars, people “stuck” in extension will exhibit a significant rib flair and what’s called a poor Zone of Apposition.

Basically the pelvis is pointing one way and the diaphragm is pointing another way, resulting in a poor position; an unstable position.

Anyone familiar with the Postural Restoration Institute and many of their principles/methods will note the massive role they’ve played in getting the industry to recognize the importance of breathing.

Not the breathing that’s involved with oxygen exchange – evolution has made sure we’re all rock stars on that front.

Instead, PRI emphasis the importance of the reach and EXHALE; or positional breathing.

It’s that exhale (with reach) that helps put us into a more advantageous position to not only encourage or “nudge” better engagement of the diaphragm, but also better alignment….which can lead to better stability and better ability to “display” strength.

NOTE: this is why I’m not a huge fan of telling someone to arch hard on their squats.


When joints aren’t stacked or in ideal positions, it can lead to compensation patterns and energy leaks which can compromise performance.

5) You Need to Control Slow Before You Can Control Fast

It’s simple.

Learn More With Elite Athletic Development 3.o

Mike Robertson and Joe Kenn released their latest resource, Elite Athletic Development 3.0 this week.

I can’t begin to describe how much information they cover, but if you’re someone who trains athletes then this is a no-brainer.

Many of the concepts I discuss above are covered, in addition to twelve more hours worth of content over the course of ten DVDs

Point Blank: You’ll learn from two of the best in the biz.

The seminar is on SALE this week at $100 off the regular price, and it ends this Friday (7/22), so act quickly.

Go HERE for more details.